How to Add a Request to Callback Form in WordPress
Do you want to add a request to callback form on your WordPress site?
A request to callback form allows users to provide you with their phone number, so you can call them at their convenience. This helps you capture more leads, improve conversions, and grow your business.
In this article, we’ll show you how to easily add a request to callback form in WordPress with bonus tips on managing the calls like a pro.
Why Add a Callback Request Form in WordPress
When visitors are interested in your product or service, they may want to connect with you to get more information. While some people prefer live chat or email, others prefer talking over the phone.
Normally, you would add a ‘Click to call‘ button that allows users to dial your business phone number.
However, not all businesses can afford a 24/7 phone service with sales or support staff answering all the calls. Request to callback form helps you fix this problem.
Instead of talking to a representative right away, customers can leave their phone numbers with other information including the best time to call them. After that, you can call them during office hours.
This allows you to offer better customer support, capture more leads, and convert more visitors into customers.
That being said, let’s take a look at how to easily add a callback request form in WordPress.
How to Add a Request to Callback Form in WordPress
The simplest way to add a callback request form to your WordPress site is by using WPForms.
It is the best WordPress form builder plugin on the market and allows you to easily add any kind of form to your WordPress website. Over 4 million websites are using WPForms to create better forms.
First, you need to install and activate WPForms plugin. For more details, see our step by step guide on how to install a WordPress plugin.
Upon activation, you need to visit WPForms » Settings page to enter your license key. You can find this information under your account on the WPForms website.
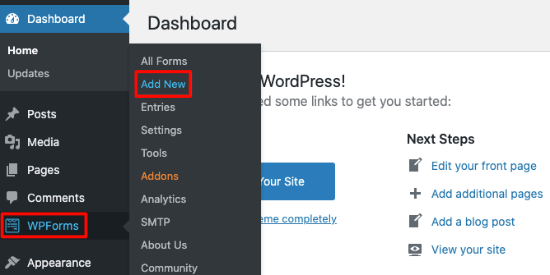
After that, you can go to the WPForms » Add New page to create your first form.
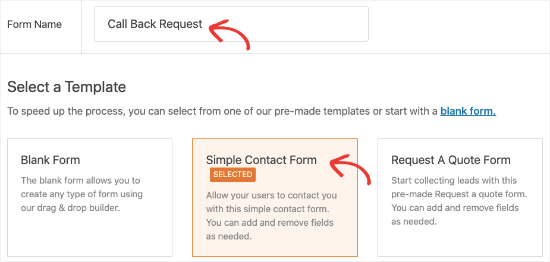
First you need to provide a title for your form and then select Simple Contact Form template.
This will load the form editor where you will see form fields on the left-hand and a live preview of your form to the right. Simply click on any field from the right column to add it to your form.
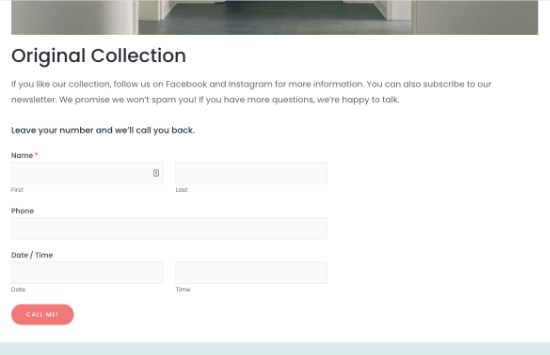
We suggest using Name, Email, Phone, and Date/Time fields in your callback request form.
You can edit any form field by clicking on it, and WPForms will automatically switch the tab to Field Options.
From here, you can change the field label and description. You can also change the format, field size, and placeholder text.
Once you’re happy with the form, click on the Save button to store your changes.
Next, you need to add the callback request form to your website.
WPForms makes it super easy to add forms to any post or page on your website.
Simply edit the post or page where you want to display the form. On the post edit screen, click on the add a new block button (+) and then add WPForms block to your content area.
Next, you need to select the form you created earlier from the dropdown menu. WPForms will automatically load a preview of your form in the content area.
You can now Save or Publish your changes and preview your post / page to see the callback request form in action.
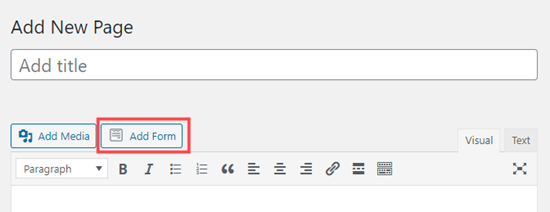
Note: If you are using the old classic editor on your WordPress site, then you can add the form by clicking on the ‘Add Form’ button above the post editor.
Customizing Your Callback Request Form Settings
Now that you’ve added a callback request form to your site, you can edit it at any time and customize it to your preferences.
Simply go to the WPForms » All Forms page and click on the form you created earlier. This opens the form builder interface where you can edit your form, add or remove fields, change labels, and more.
You can now switch to the Settings tab from the left column. From here you can change your form settings like form name, description, button label, notifications, and more.
Configure Notifications for Request to Callback Form
By default, WPForms uses your site’s administrator email to notify you when a user submits the form.
You can send notifications to any other email address if you want or set up confirmation notification emails for the users as well.
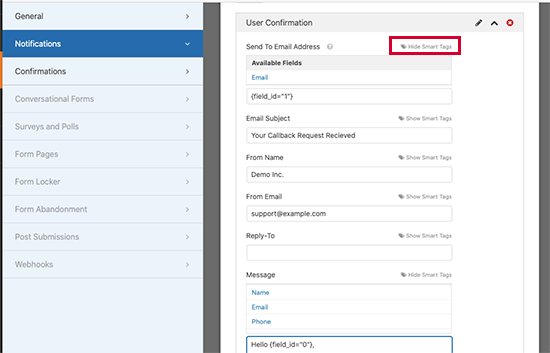
Simply switch to the Notifications tab under form settings and you will see the default notification settings. You can change them to add a different email address to notify or change the notification message.
You can also click on the ‘Add New Notification’ button to create your own custom notifications. This comes in handy when you also want to notify the user that you have received their callback request.
WPForms will ask you to provide a name for the new notification and then show you the notification settings. You can click on the smart tags to enter the value submitted by the user in the form fields, e.g. Name or Email.
Once you are finished, don’t forget to click on the ‘Save’ button to store your form settings.
We have written a detailed guide on how to send notification to multiple recipients in WPForms.
Customize the Form Submission Message for Visitors
When visitors enter their details and submit the form, a default message is displayed. You can change this to show a custom success message or redirect users to any post or page on your website.
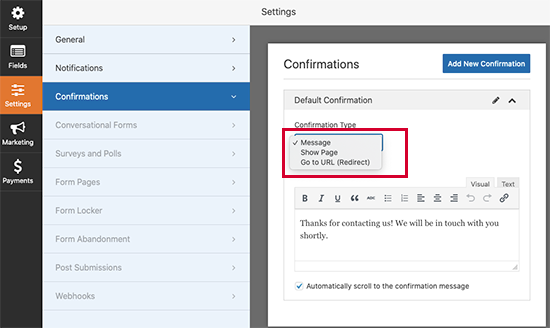
Simply switch to the Confirmations tab under form settings.
Under confirmation type, you can choose what happens when a user submits the form. You can edit the success message or redirect them to any page on your website.
Once you are finished, don’t forget to click on the ‘Save’ button to store your settings.
You can now go ahead and test your form by filling it out. Based on your confirmation settings, WPForms will then show you the success message or redirect you.
How to View ‘Request to callback’ Form Submissions in WPForms
The best thing about using WPForms is that it will automatically saves all form submissions to your WordPress database. This means you can easily view form entries even if you don’t receive email notifications.
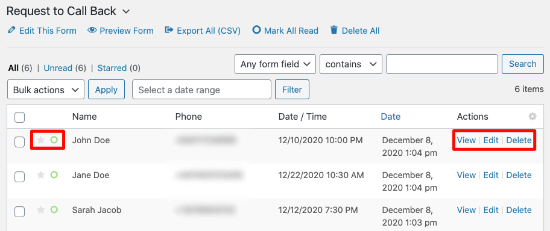
Simply go to WPForms » Entries page inside WordPress admin area and click on the form you created earlier.
On the next page, you’ll see a list of entries submitted by your users along with their details. To organize your entries, use the star to highlight the entries that are important. Use the green circle to mark the entry as ‘Read’.
Next, you can view, edit, and delete details of each entry. You can also Add Note to individual form entries, which helps you keep track of leads and create notes for follow-up requests.
Promoting The Callback Request Form on Your Website
Now that you have created a callback request form for your website, you may want to promote it so that users can easily find and take advantage of this service.
This is where OptinMonster comes in. It is the best lead generation tool on the market and allows you to easily convert website visitors into leads and paying customers.
It works really well with WPForms and you can embed your forms into popups, slide-ins, fullscreen popups, and more. See our tutorial on how to create a contact form popup in WordPress.
OptinMonster comes with powerful display rules, which allows you to display the callback form to users when it is most effective.
For example, you can only show callback form to users in a specific region or country or when users are viewing a specific page on your site.
Finding a Reliable Business Phone Service
Many businesses use their landline or mobile numbers to conduct business and answer customer calls. However, this is not the most effective solution.
Conventional phone services lack advanced call management features, which are essential for businesses to offer better customer experience.
This is why we use Nextiva in our business. They are the best business phone service provider on the market and allow you to manage your business calls using VoIP (Voice over Internet Protocol).
You can use it with any device including your mobile phone, a desk phone, laptop, or tablet. You can choose the number from any region and share it with different team members. It also includes smart features such as call forwarding, voice messages, automated responses, ringtones, and more.
The voice quality is better too and it is way cheaper than traditional phone services.
We hope this article helped you learn how to easily add a request to callback form in WordPress. You may also want to see our guide on how to track user journey on lead forms, and our ultimate WordPress conversion tracking guide to grow your business.
If you liked this article, then please subscribe to our YouTube Channel for WordPress video tutorials. You can also find us on Twitter and Facebook.

