

Back in early 2000s, government websites used to have a link on their main pages, titled “Sitemap”. This page usually contained a list of all the pages on that website. Even today some websites have such HTML sitemaps. However, sitemaps have evolved so much from the manually created HTML bulleted list. Today sitemaps are published in XML instead of HTML and their target audience is search engines and not people. Recently one of our users sent us an email asking us: what is a WordPress sitemap? Do I need to have a sitemap on my site? How can I create a sitemap in WordPress? If you are new to WordPress and had the same questions, then you are at the right place. In this article we will explain what is a sitemap, why you need a sitemap, how to create a sitemap in WordPress, and how to tell search engines about your sitemaps.
What is a WordPress XML Sitemap?
Sitemap is a list of pages on a website that is accessible to all users. An XML sitemap is a way for website owners to tell search engines about all the pages that exist on their website. WordPress XML sitemap also tells search engines which links on your website are more important than others and how frequently you update your website. While sitemaps do not boost your search rankings, it allows search engines to better crawl your website.

Why You Need an XML Sitemap
From a Search Engine Optimization (SEO) point of view sitemaps are extremely important. First we would like to clearly state that adding a sitemap does not affect search rankings. However, if there is some page on your site that is not indexed, then sitemap provide you a way to let search engines know about that page, so it can be indexed properly.
Sitemaps are very useful for new websites and blogs. As most new blogs usually don’t get many backlinks to their individual posts, it becomes harder for search engines to discover all of their posts and pages. Sitemaps allow those websites to help search engines crawl their sites more efficiently.
For popular websites, sitemaps allow your website to interact with search engines more effectively. Search engines can guess how often your site is updated, which parts of your website are more frequently updated than others, set crawl rate for your site, etc. This improves the overall visibility of your site to search engines.
Video Tutorial
If you don’t like the video or need more instructions, then continue reading.
How to create a Sitemap in WordPress?
There are several ways to create an XML sitemap in WordPress. At WPBeginner, we use Yoast’s WordPress SEO plugin to generate our sitemaps. We use this plugin because it allows us to optimize our blog posts along with offering other features such as sitemaps, social integration, and more. We have also noticed that it works more efficnelty than other standalone sitemap generators for WordPress. Lastly, it also offers custom sitemaps like the Video Sitemap.
To add a sitemap to your WordPress site, first thing you need to do is install and activate WordPress SEO by Yoast plugin. By default, WordPress SEO does not enable XML sitemap functionality, so you will have to turn it on. To do that go to SEO » XML Sitemaps and check the box to enable XML sitemap functionality.

When you check the box to enable XML sitemap functionality, WordPress SEO will show you a number of options that you can configure for your Sitemaps. If you are unsure about what to do with them, then ignore them and click on Save settings.
Now your sitemaps are generated and publicly accessible. WordPress SEO will show a XML Sitemap button which you can click to view your sitemap_index.xml sitemap.
How to Tell Search Engines About Sitemaps?
Search engines are quite smart in finding a sitemap. Whenever you publish new content a ping is sent to Google and Bing to inform them about changes in your sitemap. However, we recommend that you submit your sitemap to Google by using Google Webmaster tools. The benefit of this is that Google will now show you any errors, pages indexed, and other relevant stats that will be helpful to you as a webmaster.
Go to Google Webmaster Tools. If you are not already signed in to your Google account, then you will be asked to sign in. After signing in you will reach webmaster tools. There you will see “Add a site” button, click it and then add the URL of your website.
On the next screen you will be asked to verify the ownership of the website you are trying to add. There are several methods to do that. But since you are already using WordPress SEO plugin, then the easiest method for you is to copy the HTML Meta tag value and paste it in WordPress SEO plugin. To do that click on Alternate methods and then on HTML Tag. You will then see a line of HTML Meta tag code.

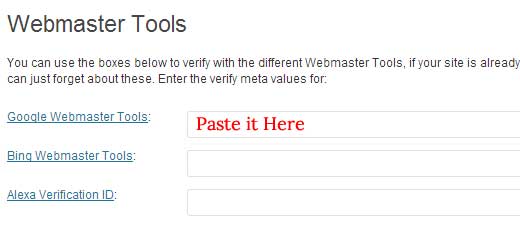
Copy and paste this line in a text editor like notepad. Now copy the value inside the content=””. Leave the webmaster tools site verification page open because we will come back to the page after adding the meta tag to verify the ownership of the website. Go to your WordPress admin area and then click on SEO tab. This will take you to WordPress SEO plugin’s dashboard. Scroll down, and you will see Webmaster Tools heading. Paste the meta tag value you copied next to Google Webmaster tools and Save Settings.
Go back to Google webmaster tools, site verification screen and press the verify button. You will see a notice like “Congratulations you have successfully verified your ownership of www.yoursite.com”. Click continue to see webmaster tools dashboard for your site.
On the next screen you will see Sitemaps column with no sitemaps in it. Clicking on it will take you to a Sitemaps page where you can add your sitemaps. Click on the red button labeled “Add/Test Sitemap” and provide the URL of your sitemap.

Yoasts WordPress SEO plugin publishes multiple sitemaps for your WordPress site. The main sitemap is sitemap_index.xml which contains link to your other sitemaps. You can either submit sitemap_index.xml alone or submit all other sitemaps one by one. We recommend submitting sitemap_index.xml alone, Google will then automatically discover other sitemaps and crawl them.
Once you have successfully added your sitemap, it will appear as pending. It will take Google sometime to crawl your website. After a while you would be able to see some stats about your sitemap. It will show you the number of links it found in your sitemap, how many of them got indexed, a ratio of images and web pages, etc.

Visit Google Webmaster tools often, at least once a month. As your site gets older you will start seeing more and more useful data about your website and how it is seen by the search engine. This information can help you learn how well your site is doing and what other things you can do to improve its performance in search engines.
We hope that it answered all the related questions like what is an XML sitemap, what are the benefits of a sitemap, how to create a sitemap in WordPress, and more. If you have any questions, or noticed that we missed something, then please leave a comment below.

