
How to Allow Users to Submit Posts to Your WordPress Site
Have you ever seen websites that allow users to submit posts or other type of content? Do you want to have user-submitted content on your site? In this article, we will show you how to allow users to submit blog posts to your WordPress site.
You will be able to moderate all user-submitted content like comments and approve them only if you like it. Your users will be able to submit blog posts from the front-end without ever logging into your admin area.
If you want to require only registered users to submit blog posts, then we will show you that as well.
Frontend publishing is very useful when you want users to submit guest blog posts, add images to your gallery, or create new business listings in your business directory.
Having said that, let’s look at the three ways to allow users to submit posts on your WordPress site without writing any code.
Method 1: Front-end WordPress Post Submissions with WPForms
This method allows your users to submit posts from the front-end of your website without visiting the admin area of your WordPress site. You can even accept blog posts from users without asking them to register.
First thing you need to do is install and activate the WPForms plugin. For more details, see our step by step guide on how to install a WordPress plugin.
WPForms is a premium WordPress forms plugin. You will need the pro version of the plugin to access the post submissions addon.
Upon activation, you need to visit WPForms » Settings page to enter your license key. You can get this key from your account on the WPForms website.

After verification, you need to visit WPForms » Addons page. Scroll down to ‘Post submissions addon’ and click on the ‘Install Addon’ button.

WPForms will now install the post submissions addon for you. You will need to click on the Activate button to start using the addon.
You are now ready to create a post submission form.
Head over to WPForms » Add New page which will launch WPForm’s form builder interface.
First you need to provide a name for your form. Under ‘Select a Template’ section, you need to click on ‘Blog post submission form’ template.
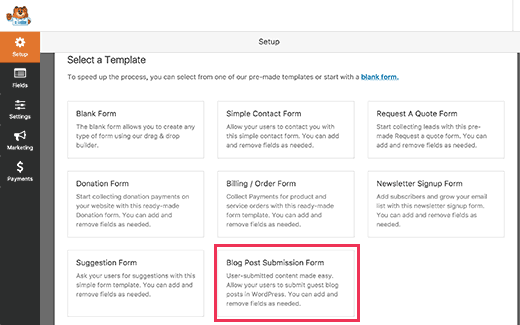
WPForms will now load the form template with all the fields that you will need for a typical blog post submission form.
You can edit form fields by clicking on them. You can also add new fields from the panel on your left.

WPForms let your users select post categories, add featured images, post excerpts, and even add custom fields.
Once you are satisfied with the form, you need to click on the ‘Settings’ tab and then click on ‘Post Submissions’ tab.
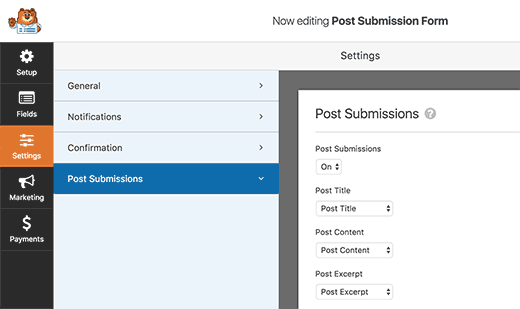
On this page, you can map each fields to the respective post fields in WordPress. WPForms does an excellent job at matching the fields in the form template.
By default, user submitted posts will be saved as ‘Drafts’ pending review. You can also change the post type and allow users to submit content to your custom post types.
Don’t forget to click on the Save button at the top right corner of the screen to save your form. Click on the close button to exit the form builder.
Now you are ready to add the form to your website.
You can create a new page or edit an existing one. On the post edit screen, you will notice the ‘Add Form’ button.

This will bring up a popup where you need to select the post submission form you just created.
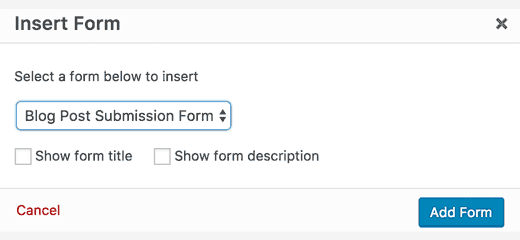
Click on the Add form button, and you will notice the WPForms shortcode appear in the post editor.
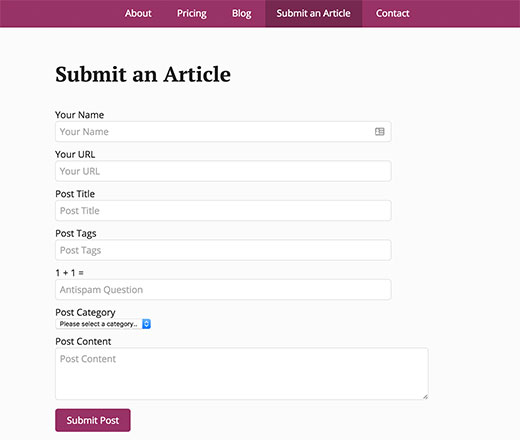
You can now save or publish this page and then visit your website to see your post submission form in action.

Method 2: Accept User-Generated Content with User Submitted Posts Plugin
Another way to accept user submitted content on your website is by using the User Submitted Posts plugin.
First thing you need to do is install and activate the User Submitted Postsplugin. For more details, see our step by step guide on how to install a WordPress plugin.
Upon activation, you need to visit Settings » User Submitted Posts to configure the plugin.

Under plugin settings, you can select the fields you want to display on the post submission form and hide any field that you don’t want users to see.
You can choose a default author for all user submitted content. We would recommend that you create a new Guest User on your WordPress site and assign all user submitted posts to that user.
You can also allow users to upload images and set a limit on number of images and maximum image size. You can even set a user uploaded image as the featured image.
After reviewing all plugin settings, click on the Save Changes button to store your settings.
You are now ready to add the user submitted posts form to your website.
Create a new page in WordPress or edit an existing page where you would like to show the form. In the post editor simply add this shortcode
[user-submitted-posts]
You can now save or publish your page. Visit the page to see your user submitted posts form in action.
Method 3: Allowing Users to Register and Submit Posts in WordPress
WordPress comes with built in user roles and capabilities which allow you to run a multi-author WordPress site.
You can allow users to register on your site and create content using WordPress admin interface with limited capabilities.
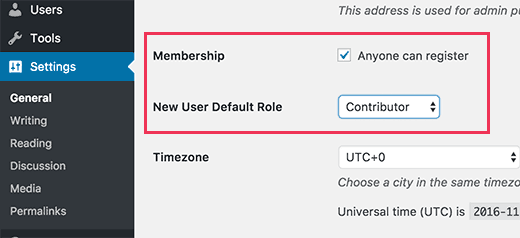
First you need to enable user registration on your site. Go to Settings » General page and check ‘Any one can register’ next to Membership option. Choose ‘Author’ or ‘Contributor’ as the default user role.
Don’t forget to click on the ‘Save Changes’ button to store your changes.
Users can now register on your WordPress site by visiting the WordPress login and registration pages. You can even create custom user registration form in WordPress.
Once registered, users can login to your WordPress site and submit posts.
Problems with this method:
Many beginners find this method a bit difficult for different reasons.
For example, if you are using two step authentication on your WordPress site, then your users may find it difficult to login.
Many websites password protect WordPress admin directory. Allowing users to register and use WordPress admin area means you will have to share that password with them.
Registered users with author roles can see what other posts you have on your website.
If these issues bother you, then you can use method #1 or #2 to allow users to submit WordPress posts without logging into admin area.
That’s all. We hope this article helped you learn how to allow users to submit posts to your WordPress site. You may also want to see our list of 19 actionable tips to drive traffic to your WordPress site.
If you liked this article, You can also find us on Twitter and Facebook.
