How to Add Google+ Hangouts Event Countdown in WordPress
Google+ hangouts are fun specially if you want to organize an online event with your blog’s readers. Like most live events, you have to make sure to spread the word in order to get the most benefits. You can let your users know about the hangout by tweeting, sharing it on Google+, writing an article, sending an email newsletter, and many more ways. In this article, we will show you how to add a Google+ Hangout Event with a Countdown in your WordPress blog. The goal is to add a widget to the sidebar that shows a hangout event with a countdown timer.

To achieve this you will need a Google+ Account and a Google API account. First, install and activate Yakadanda Google+ Hangout Events plugin. After activation, go to the plugin’s settings page located under Settings » Google+ Hangout Events. There you will see the plugin’s configuration screen.
Now you need to get the Google API keys. Go to Google APIs Console and click on Create Project button.

Provide a suitable name for your project, e.g. WPBeginner Hangout Events. After that you will enter the Google APIs Console dashboard. On the left hand sidebar you will see API Project drop down menu. Click on “Create” at the bottom of the menu.

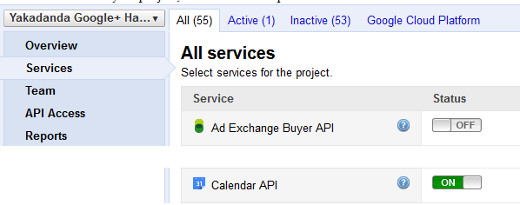
Enter the name of your project, e.g. WPBeginner Intro Hangout. Click on the Services item in the left hand sidebar to turn on the Google Calendar API.

Now you will reach API Access menu of your project, and you need to create oAuth 2.0 client ID. Click the button to create OAuth 2.0 client ID. You will be asked to fill in Branding Information for your project. Provide a product name this could be anything, e.g. WPBeginner Hangout App. Logo and Home Page URL fields are optional so you can leave them blank and click the Next button.

On the next screen choose Web Application for the Application Type. In your site or hostname field, first you need to choose http:// instead of https:// from the drop down menu. Second, you need to enter the URL of the oauth2callback.php file inside Yakadanda Google Hangout Events plugin directory. Example:
http://www.example.com/wp-content/plugins/yakadanda-google-hangout-events/oauth2callback.php
Replace example.com with your own domain name. Once you enter this, the Redirect URI will automatically change itself. Press the Create Client ID button, and you will reach API Access page with all the keys you need.

Go back to your Google Hangout Events plugin page. In Calendar ID field, enter the email address of the Google+ account you will be using to create Hangout events. Enter your API keys by pasting them from Google API Access page. Click save changes, and you will be taken to a Google Accounts page asking permission to connect the plugin. Click Allow Access and you will be redirected to plugin setiings page.

Now go to Appearance » Widgets and add Google+ Hangout Events widget to your sidebar. The widget will immediately start displaying Google+ hangout Events you have created.
Creating a Google Plus Hangout Event
Go to Google+ Events and then click on Create Event button. Click on Event Options button and then choose Advanced. In the Advanced menu choose Google Plus Hangout. Finally press the green Invite button and you are good to go.

We hope that you found this tutorial useful in helping you organize hangouts on your blog or website. While you are on Google+, don’t forget to add WPBeginner to your Google+ circles.
