...

How to Add Instant Search in WordPress with Algolia

86

Have you ever wanted to add an instant search feature in your WordPress site? The default WordPress search feature is quite limited which is why a lot of probloggers replace it with third-party tools and plugins. In this article, we will show you how to add instant search in WordPress with Algolia.

Instant Search for WordPress

Why Add an Instant Search Feature in WordPress?

The default WordPress search is plain and often not relevant. This is why many WordPress users replace it with third-party search tools like Google Search, or WordPress plugins like SearchWP. See our list of 12 WordPress search plugins to improve your site search.

A search feature on your website can significantly improve user experience. It helps users find content, which increases your pageviews and the time users spend on your website.

Instant search feature helps users find content as quickly as they start typing. This helps users get to their desired content much quickly. Think of it as MacOS’s spotlight feature for your WordPress site.

Having said that, let’s take a look at how to add instant search to your WordPress site with Algolia.

What is Algolia?

Algolia is a cloud based search platform that allows you to build beautiful search experiences for your websites and applications.

Once activated, Algolia will index all content on your website and replace the default WordPress search with a more powerful cloud based search.

It comes with a built-in instant search feature which means your users can get to the content faster without even seeing a search results page.

Algolia offers a free plan with 10,000 records and 100,000 queries per month. Their paid plans start from $49 per month and come with a 14 day free trial.

Video Tutorial

Subscribe to WPBeginner

If you don’t like the video or need more instructions, then continue reading.

Adding Instant Search in WordPress with Algolia

First, you need to visit Algolia website and sign up for an account.

Sign up for Algolia

Next, you need to install and activate the Search by Algolia plugin. For more details, see our step by step guide on how to install a WordPress plugin.

Upon activation, the plugin will add a new menu item labeled Algolia to your WordPress menu. Clicking on it will take you to the plugin’s settings page.

Algolia plugin settings page

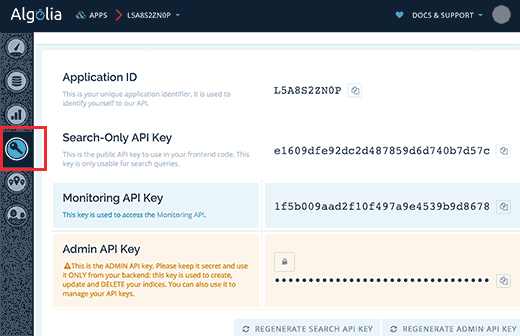
You will be asked to provide application ID and API keys. You can obtain this information from your Algolia account dashboard.

API Keys

Copy and paste the required keys in the plugin’s settings page and then click on the save changes button to store your settings.

Next, you will be asked to index your content. Indexing allows Algolia to crawl and create an index of your content, so that it can be searched quickly without slowing down your website.

You can begin indexing by visiting Algolia » Indexing page and select the content types you want to be indexed. Don’t forget to click on the save changes button.

Begin indexing

Algolia will now start indexing your content. It may take a while depending on how much content you have on your website.

Next, you need to enable the autocomplete feature. Go to Algolia » Autocomplete and check the box next to ‘Enable autocomplete’ option. After that you need to scroll down and select the content types to include in your autocomplete results.

Autocomplete

Don’t forget to click on the save changes button to store your settings.

Lastly, you need to replace the default WordPress search with the Algolia instant search. You can do this by going to Algolia » Search Page and select ‘Use Algolia in the backend’ option.

Search page

Selecting Algolia in the backend replaces your WordPress search with Algolia search.

Click on the save changes button to store your settings.

Adding Instant Search Box in WordPress

Now that you have successfully setup Algolia, let’s go ahead and add an instant search box on your website.

Algolia automatically replaces the default WordPress search form with an Algolia powered search.

If you have already added the search form to your WordPress site, then it will start showing results using Algolia automatically.

If you haven’t added a search form, then go to Appearance » Widgets page. Drag and drop the search widget to your sidebar. See our guide on how to add and use widgets in WordPress.

Search widget

Please make sure to click on the save button to store your widget settings.

That’s all, you can now visit your website to see the instant search in action. Start by typing in the search box, and Algolia will start showing results as you type.

Preview of instant search in WordPress with Algolia

We hope this article helped you add instant search in WordPress with Algolia. You may also want to see our list of 24 must have WordPress plugins for business websites.

If you liked this article, then please subscribe to our YouTube Channel for WordPress video tutorials. You can also find us on Twitter and Facebook.

Seraphinite AcceleratorOptimized by Seraphinite Accelerator
Turns on site high speed to be attractive for people and search engines.