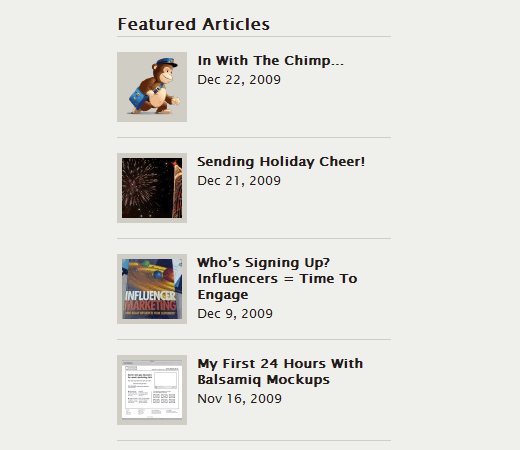
There are numerous ways shared on the web to display Featured Posts. But almost all functions and plugins lack something. In this tutorial, we will share a function which will allow users to select specific Post IDs and display them as featured posts with thumbnails by utilizing the WordPress Post Thumbnail feature that was added in WordPress 2.9. This way allows you to avoid using Sticky posts which sometimes may be necessary due to other functions in a custom project.
Note: This is a Multi-Part tutorial, so we recommend that you have some knowledge of WordPress, PHP, HTML, and CSS.
We modified the plugin Featured Posts Lists by San of W3C Gallery. Even though San has created an advanced version of his plugin to show images, it requires a custom field. This way you will just use Post Thumbnail feature in 2.9.
Final Product

Modified Plugin
First you would need to paste the code below in your functions.php file OR in a separate file and upload it as a plugin.
<?php /* Plugin Name: Featured Posts List with Thumbnail Plugin URI: http://www.w3cgallery.com/w3c-css/display-specificmultiple-posts-as-featured-post-list-plugins Description: Display specific/multiple posts List with Thumbnails on your sidebar or any place of your site. It creates a tab "Featured Posts List" in "Settings" tab Version: 2.0 Author: SAN – w3cgallery.com & Windowshostingpoint.com & Syed Balkhi Author URI: http://www.w3cgallery.com/ */ // Main function to diplay on front end function featuredpostsList() { global $post, $wpdb, $posts_settings; // posts_id from database $posts_id = $posts_settings['posts_id']; if($posts_id) { $posts_idarray = explode(',',$posts_id); foreach ($posts_idarray as $list){ $post = new WP_Query('p='.$list.''); $post->the_post(); ?> <div class="popcontainer"> <div class="popthumb"><a href="<?php the_permalink(); ?>" title="<?php the_title(); ?>"><?php the_post_thumbnail(); ?></a></div> <div class="popcontent"> <h2><a href="<?php the_permalink() ?>" rel="bookmark"><?php the_title(); ?></a></h2> <div class="popauthor"><?php the_time('M j, Y') ?></div> </div> </div> <?php } } else { echo $before ."None found". $after; } } $data = array( 'posts_id' => '' ); $ol_flash = ''; $posts_settings = get_option('posts_settings'); // ADMIN PANLE SEETTING function posts_add_pages() { // Add new menu in Setting or Options tab: add_options_page('Featured Posts List', 'Featured Posts List', 8, 'postsoptions', 'posts_options_page'); } /* Define Constants and variables*/ define('PLUGIN_URI', get_option('siteurl').'/wp-content/plugins/'); /* Functions */ function posts_options_page() { global $ol_flash, $posts_settings, $_POST, $wp_rewrite; if (isset($_POST['posts_id'])) { $posts_settings['posts_id'] = $_POST['posts_id']; update_option('posts_settings',$posts_settings); $ol_flash = "Your Featured List has been saved."; } if ($ol_flash != '') echo '<div id="message"class="updated fade"><p>' . $ol_flash . '</p></div>'; echo '<div class="wrap">'; echo '<h2>Add Posts ID to Create Featured Post List</h2>'; echo '<table class="optiontable form-table"><form action="" method="post"> <tr><td colspan="2"><strong>This plugin gives full freedom to display multiple posts as Featured Post List to your site.</strong></td></tr> <tr><td><strong>Post ID :</strong></td><td><input type="text" name="posts_id" value="' . htmlentities($posts_settings['posts_id']) . '" size="50%" /></td></tr> <tr><td colspan="2"><strong>SAN Hint: To Add Multiple Post IDs use " , " for exmple : " 1, 2, 3" </strong></td></tr> </table>'; echo '<Div class="submit"><input type="submit" value="Save your list" /></div> <p>Paste this code into where you want it to display featured posts list <strong><?php featuredpostsList(); ?></strong> <br/> Or you can pass variable before and after like this default setting <strong><?php featuredpostsList($before = <li>", $after = </li>") ?></strong></p> </form>'; echo '</div>'; } add_action('admin_menu', 'posts_add_pages'); ?>
Once you have done that then you can display it by pasting the code anywhere in your template file:
<?php featuredpostsList(); ?>
Custom CSS
We are using custom CSS classes, so you would need them as well. Paste the following code in your style.css file.
.popcontainer{ border-bottom: 1px solid #D0CDC5; width: 274px; float: left; padding: 0 0 15px 0; margin: 0 0 15px 0; } .popthumb{ width: 60px; float: left; background: #D0CDC5; padding: 5px; margin: 0 10px 0 0; } .popcontent{ width: 185px; float: left; } .popcontent h2{ font-size: 13px; margin: 0 0 3px 0; padding: 0; } .popcontent h2 a{ text-decoration: none; }
Advanced Options
The above code will pull your default thumbnail and display it with the post title and the date the post was published. The only problem is that if you want to use a different size of thumbnail. Your theme might be using the thumbnail feature elsewhere thus you cannot use two different sizes with the current codes. So you will have to tweak it a little bit and add a new image size.
Open your functions.php and find the thumbnail codes and add the following code:
add_theme_support( 'post-thumbnails' ); set_post_thumbnail_size( 150, 150, true ); // Normal post thumbnails add_image_size( 'featured-thumbnail', 60, 60 ); // Featured thumbnail size
Now find the following line in the plugin above:
<div class="popthumb"><a href="<?php the_permalink(); ?>" title="<?php the_title(); ?>"><?php the_post_thumbnail(); ?></a></div>
and Replace it with:
<div class="popthumb"><a href="<?php the_permalink(); ?>" title="<?php the_title(); ?>"><?php the_post_thumbnail('featured-thumbnail'); ?></a></div>
This would allow you to have two different sizes.
Another known issue would be if your thumbnail is not proportional, it would cause a smaller image to display rather than 60 x 60px because WordPress does not have the cropping ability. To avoid that you can use Additional Image Sizes Plugin which has the ability to crop. Name the custom image size as featured-thumbnail and use the same code as above to replace the original code.
The sole reason why we used this method was because we were using Sticky posts to display another list. You can also achieve this by using sticky posts. For the thumbnail trick, we chose the Additional Image Sizes plugin because we want to avoid using TimThumb JavaScript and maintain a fast loading site.
If you have additional solutions to this problem, please share it with us in the comments.
