How to Minify CSS / JavaScript Files in WordPress (3 Ways)
Do you want to minify files on your WordPress site?
Minifying your WordPress CSS and JavaScript files can make them load faster and speed up your WordPress site.
In this guide, we will show you how to easily minify CSS/JavaScript files in WordPress to improve performance and speed.


What is Minification and When Do You Need it?
The term ‘minify’ is used to describe a method that makes your website file sizes smaller. It does this by removing white spaces, lines, and unnecessary characters from the source code.
Here is an example of normal CSS code:
body { margin:20px; padding:20px; color:#333333; background:#f7f7f7; } h1 { font-size:32px; color#222222; margin-bottom:10px; }
After minifying the code it will look like this:
body{margin:20px;padding:20px;color:#333;background:#f7f7f7} h1{font-size:32px;margin-bottom:10px}
Usually, it is recommended to only minify files that are sent to user’s browsers. This includes HTML, CSS, and JavaScript files.
You can minify PHP files too, but minifying it will not improve page load speed for your users. That’s because PHP is a server-side programming language, meaning it runs on servers before anything is sent to the visitor’s web browser.
The advantage of minifying files is improved WordPress speed and performance, since compact files are faster to load.
However, some experts believe that the performance improvement is very small for most websites and not worth the trouble. Minification only removes a few kilobytes of data on most WordPress sites. You can reduce more page load time by optimizing images for the web.
If you are trying to achieve 100/100 score on Google Pagespeed or GTMetrix tool, then minifying CSS and JavaScript will significantly improve your score.
Having said that, let’s take a look at how to easily minify CSS/JavaScript on your WordPress site.
We’ll go over 3 different options you can choose from:
- Method 1. Minify CSS/JavaScript in WordPress Using WP Rocket (Recommended)
- Method 2. Minify CSS/JavaScript in WordPress Using SiteGround
- Method 3. Minify CSS/JavaScript using Autoptimize
Ready? Let’s get started with our top recommended method.
Method 1. Minify CSS/JavaScript in WordPress Using WP Rocket
This method is easier and is recommended for all users. It works regardless of which WordPress hosting you are using.
First, you need to install and activate the WP Rocket plugin. For more details, see our step by step guide on how to install a WordPress plugin.
WP Rocket is the best WordPress caching plugin on the market. It allows you to easily add caching to WordPress and significantly improve website speed and page load times.
For more details, see our tutorial on how to install and set up WP Rocket in WordPress.
Upon activation, you need to visit the Settings » WP Rocket page and switch to the ‘File Optimization’ tab.


From here, you need to check the Minify CSS files option.
WP Rocket will then show you a warning that this could break things on your site. Go ahead and click on the ‘Activate Minify CSS’ button. You can always deactivate this option if it causes any issues with your website.


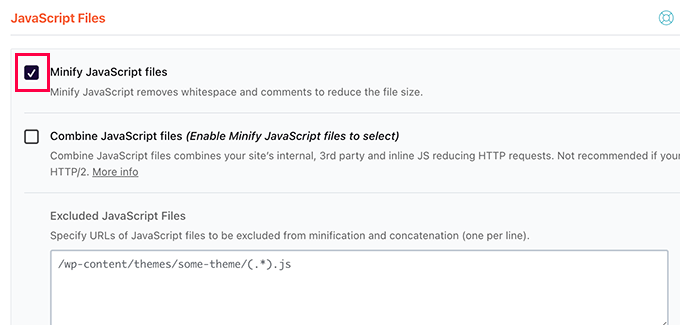
Next, you need to scroll down to the JavaScript Files section below.
Here, simply check the box next to the ‘Minify JavaScript files’ option.


Again, you’ll see a warning that this could break things on your site. Go ahead and click on the ‘Activate Minify JavaScript’ button.
After that, don’t forget to click on the Save changes button to store your settings.
WP Rocket will now start minifying your CSS and JavaScript files. You can clear your cache in the plugin settings to make sure that it starts using the minified CSS and JavaScript for the next website visitor.
Method 2. Minify CSS/JavaScript in WordPress Using SiteGround
If you are using SiteGround as your WordPress hosting provider, then you can minify CSS files using SiteGround Optimizer.
SiteGround Optimizer is a performance optimization plugin that works on their own platform. It works well with their Ultrafast PHP to improve your site’s loading times.
Simply install and activate the SiteGround Optimizer plugin on your WordPress site. For more details, see our step by step guide on how to install a WordPress plugin.
After that, you need to click on the SG Optimizer menu in your WordPress admin sidebar.


This will take you to SG Optimizer settings.
From here you need to click on the ‘Go To Frontend’ button under ‘Other Optimizations’.


On the next screen, you need to switch on the toggle next to the ‘Minify CSS files’ option.


Next, you need to switch to the JavaScript tab and turn on the toggle next to ‘Minify JavaScript Files’ option.
That’s all! You can now empty your WordPress cache and visit your website to load minified versions of CSS and JS files.
Method 3. Minify CSS/JavaScript using Autoptimize
This method is recommended for users who are not on SiteGround and not using WP Rocket.
First, you need to install and activate the Autoptimize plugin. For more details, see our step by step guide on how to install a WordPress plugin.
Upon activation, you need to visit the Settings » Autoptimize page to configure the plugin settings.
From here, first you need to check the option ‘Optimize JavaScript Code’ under JavaScript Options.


After that, you need to scroll down to the CSS Options and check the box next to the ‘Optimize CSS code’ option.


Don’t forget to click on Save Changes button to store your settings.
Then you can click the Empty Cache button to start using your minified files. The plugin can also be used to fix render blocking JavaScript and CSS in WordPress.
We hope this article helped you minify CSS and JavaScript on your WordPress site. You may also want to see our tutorial on optimizing core web vitals in WordPress and follow our ultimate WordPress performance guide.
If you liked this article, then please subscribe to our YouTube Channel for WordPress video tutorials. You can also find us on Twitter and Facebook.
