How to Run a Giveaway / Contest in WordPress with RafflePress
You may have seen many popular blogs and websites running contests to get more engagement on their website.
The truth is that running a giveaway is one of the fastest way to get more subscribers, customers, and users on your website.
Even with just a few users and the right tool, you can make a viral giveaway and reach out to a larger audience.
In this article, we will show you how to easily run a giveaway or contest in WordPress with RafflePress.

Why Run a Giveaway or Contest in WordPress?
There are many ways to get more subscribers, increase traffic, or boost sales on your website.
However, running a giveaway gives you instant results. It encourages social actions which boost your reach and help new users find your website.
With a properly executed giveaway, you can quickly achieve the following:
- Get more traffic to your website
- Grow your email list
- Increase social media followers
- Build user engagement on your website
- Get leads and new customers
- Build brand recognition and grow your business
Running a contest on your WordPress website gives you the ability to control the user experience and target even more channels.
For example, running a contest on Instagram will give you more Instagram followers, but it will not help you get email subscribers.
Whereas running a giveaway on your WordPress site can help you get more Instagram followers, more email subscribers, more YouTube subscribers, and more.
That being said, let’s take a look at how to run a successful giveaway or contest in WordPress.
Set Goals for Your Giveaway Campaign
Before you move forward, let’s decide what you are hoping to accomplish from your giveaway or contest campaign.
Here are some of the goals that businesses try to achieve with a successful giveaway campaign.
- Increase website traffic
- Make more sales
- Capture more leads and email subscribers
- Grow social media following
- Promote an event, product, or service
Setting a goal will allow you to set clear targets for your campaign. It will also help you design an effective strategy to achieve those goals.
Choose a Suitable Prize for Giveaway Winners
Prize or prizes is what motivates users to take part in your giveaway contest. You would want to choose the prize based on your business niche and your target audience.
For example, if you run a dropshipping business, then you may want to offer a t-shirt or mug with your brand name on it.
If you run a restaurant, then a discounted or free meal could be a great prize.
It is not necessary to choose an expensive prize. It has to be thoughtful, related to your business, and useful for your target audience.
You can also choose multiple prizes, which will increase the chances of more users to win.
For example, when we run giveaways on Latest Blog, we typically giveaway free licenses of WordPress plugins and themes.
Once you have chosen the prize, it is time to set it all up in WordPress.
Setting up a Contest / Giveaway in WordPress
In the early days, WordPress didn’t have many reliable contest plugins. The few third-party services that existed were either too buggy or were simply too expensive.
This changed, with RafflePress.
It is the best WordPress giveaway plugin on the market, and it allows you to easily run giveaways on your website.
It comes with social media integrations for all popular platforms (Facebook, Twitter, Instagram). This helps you create viral giveaway campaigns.
RafflePress also comes with 1-click fraud protection and verified actions. This ensures that all actions recorded by the plugin are genuine interactions.
Let’s set up your first giveaway.
First, you’ll need to do is install and activate the RafflePress plugin. For more details, see our step by step guide on how to install a WordPress plugin.
There is a free version of RafflePress available as well, but we use the Pro version on Latest Blog, so we can take advantage of all the powerful features.
For the sake of this tutorial, we will be showing the Pro version.
Upon activation, the plugin will add a new menu item labeled ‘RafflePress’ in your WordPress admin sidebar. Clicking on it will take you to plugin’s settings page.

First, you will need to enter your license key. You can find this information under your account on RafflePress website.
After entering your license key, you are now ready to create your first Giveaway.
Simply visit RafflePress » Add New page to get started.

This will launch the RafflePress giveaway builder.
First, you need to provide a name for your new giveaway campaign. After that, you need to select a template to use as a starting point.

RafflePress comes with several goal based campaign templates to choose from. These templates are designed to help you get the best results for specific goals like growing your email list, grow your social following, refer-a-friend, Instagram contest, and more.
You can select one that best suits your goals. For the sake of this tutorial, we will be using the classic giveaway template.
RafflePress will now load the template in the builder.
Add Your Giveaway Prize Details
First, you need to set a prize for your giveaway. Click on the pencil icon under to the Giveaway Prize Details section to enter prize title and description.

You can also upload an image to display with your prize description.
Once you are finished, click on the ‘Done editing’ button to save prize details.
Add Your Contest or Giveaway Actions
Giveaway actions are the ways your users can participate in the contest. RafflePress comes with several actions that you can add to your campaign.
You would want to choose the actions that help you achieve your campaign goal. For example, if you wanted to increase Instagram followers then adding ‘Visit us on Instagram’ action will be more beneficial.
You need to switch to the ‘Actions’ tab from the left menu, and you will see the list of actions you can add.
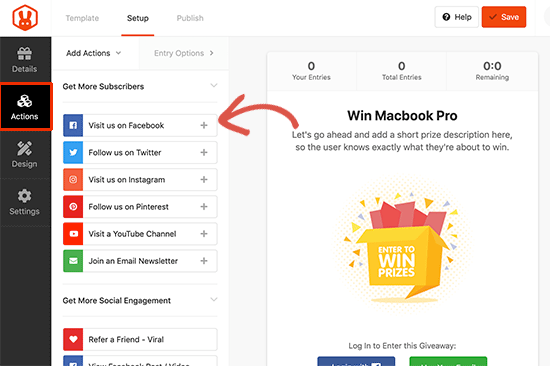
Next, click to add an action to your campaign, and you will see it appear below your prize details. You can then edit the action settings from the left column.
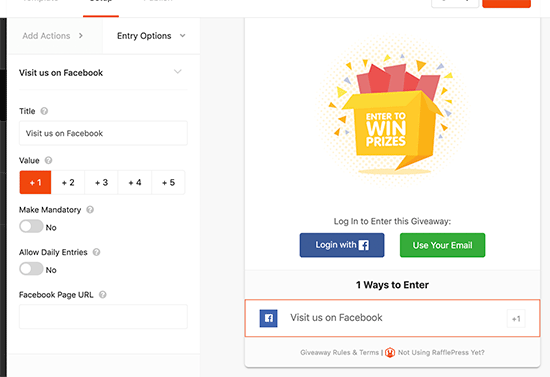
Each action comes with some basic settings. You can set a title for that action, select the number of entries users will earn for completing it, allow daily entries, or make an action mandatory.
Apart from these settings, you will also see settings related to specific actions. For instance, if you want users to visit your Facebook page, then you will need to enter your Facebook page URL.
Fill in the settings for the action and then switch back to the ‘Add Actions’ tab to add some more.
You can add as many actions as you like. Adding more options gives your users more ways to participate, and it helps you promote more marketing channels.
However, we do recommend prioritizing the channels based on your campaign goals. For instance, if you wanted to promote your Pinterest page, then you can move it to the top.

Simply take your mouse to the actions and then use drag and drop to adjust their order.
Don’t forget to click on the ‘Save’ button on the top to store your giveaway settings.
Customize Your Giveaway Appearance
Now that your giveaway is set up, let’s change its appearance.
Switch to the ‘Design’ tab in the builder interface and select a layout, font, and button color for your giveaway.
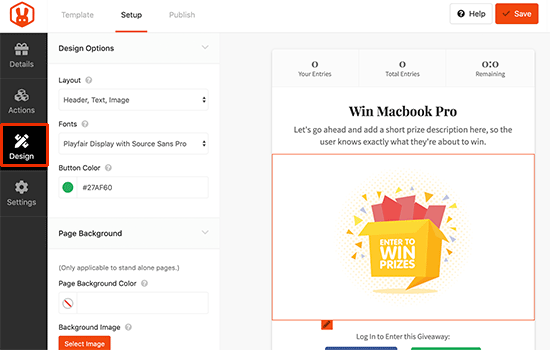
You can also set background color and image if you want to create a giveaway landing page (more on this later in this article).
RafflePress will show you a live preview of your giveaway as you make changes. Once you are satisfied, don’t forget to click on the ‘Save’ button to store your changes.
Adjust Giveaway / Contest Settings
RafflePress allows you to configure every aspect of your giveaway. You can set rules, show / hide options, set up tracking, and more.
Let’s take a look at these options.
Switch to the ‘Settings’ tab from the left menu and click on the ‘General’ tab. From here you can set basic options for your giveaway including the option to show winners, number of entries, limit signups per IP, and more.
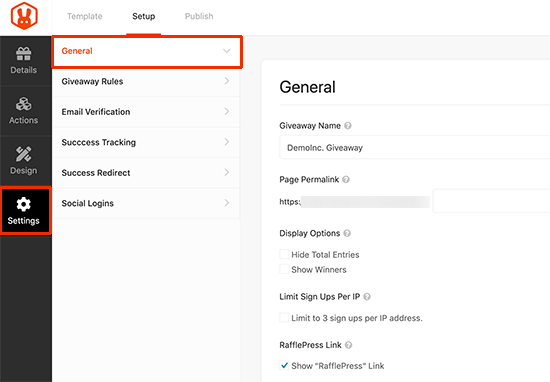
Next, you need to switch to the ‘Giveaway rules’ tab.
RafflePress comes with a Rules Generator which allows you to easily generate giveaway rules for your campaign.
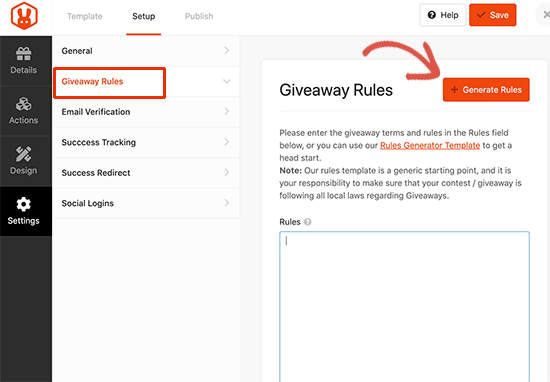
Clicking the button will bring up a form where you need to enter your giveaway details. In most cases, you or your company will be the sponsor of the contest. You’ll need to provide the company name, address, country, and eligible locations information.
.

RafflePress will then use this information and generate basic giveaway guidelines and rules.

Next, you need to switch to the Email verification tab.
From here you can turn on email verification, which will only accept entries from users who verify their email address.

Next comes ‘Success tracking’, this option allows you to add Google Analytics code. You can add these scripts on load or after a user completes an action.
![]()
Next, click on the ‘Success Redirect’ tab. From here you can redirect users to any page after the successfully complete all actions.

Lastly, you will reach the social logins section. You can simply turn on social logins and allow users to join the giveaway by signing in with their Facebook account.

Don’t forget to click on the save button to store your changes.
Publish and Add Giveaway to Your Website
Now that your giveaway is ready, it is time to publish and display it on your website.
RafflePress makes it super easy to add your giveaway anywhere on your website. There are three ways you can do so.
- You use the RafflePress block to add giveaway in a blog post or page
- You can use shortcode to add it anywhere posts, pages, sidebar widgets
- You can also create Giveaway landing page
Let’s check out each of these items.
Method 1. Using the RafflePress block
Simply create a new post or page in WordPress or edit an existing one. On the edit screen, click on the add new block button and then select RafflePress.

After adding the block, simply click on the dropdown menu to select the giveaway you created earlier.

Method 2. Using the shortcode
RafflePress also allows you to use shortcodes to add giveaway into your blog posts, pages, or sidebar widgets.
Simply edit your giveaway and switch to the ‘Publish’ tab in the builder interface. From here, click on the shortcode option and RafflePress will show the shortcode you can use.

Copy the shortcode and add it anywhere you want to display your giveaway campaign.
Method 3. Create a giveaway landing page in WordPress
RafflePress also allows you to create a standalone giveaway landing page in WordPress. Simply edit your giveaway and go to the publish tab.
Now click on the landing page option and click below to set up your landing page.

This will bring you to the settings page where you need to create a URL for your landing page. Click on the view button to see your landing page in action.

RafflePress will open your giveaway landing page. You can now copy the URL and start promoting your giveaway page.

Publicize Your Giveaway / Contest
You will need to start promoting your giveaway even before it begins. This would give you time to spread the word and build excitement.
You can start by sending an email newsletter to your subscribers and announcing it on your social media profiles (Facebook, Twitter, Instagram).
You can also promote it on relevant online communities and forums. Reach out to influencers, friends, and family members to help you generate initial buzz.
Announcing Giveaway Winners
Once your giveaway reaches it’s end time, RafflePress will automatically stop receiving new entries.

It is now time for you to choose winners.
RafflePress allows you to randomly pick winners in a draw. Simply go to RafflePress » Giveaways page and click on the ‘Need Winners’ link next to your giveaway.

You will now see all the users that participated in the giveaway. You need to click on the ‘Pick winner’ button at the top to randomly select a winner.

RafflePress will now ask you how many winners to choose. After that, it will randomly pick the winners. You can then email those users to let them know how they can claim their prize.

That’s all, you have successfully created a giveaway in WordPress.
We hope this article helped you learn how to easily create and run successful giveaways and contests in WordPress. You may also want to see our expert tips on getting more traffic to your website.
If you liked this article, then please subscribe to our feedburner for WordPress video tutorials. You can also find us on Twitter and Facebook.
