WordPress Post Revisions Made Simple: A Step by Step Guide (2019)
Did you know that WordPress comes with a built-in feature that allows you to undo changes and go back to a previous version of a post?
This feature is called Post Revisions or simply Revisions.
Most of us make mistakes when writing. Sometimes you might wish that you hadn’t deleted what you wrote earlier. Revisions allow you to fix that by going back in time and undoing the changes.
In this article, we will show you how to easily undo changes in WordPress with post revisions. We will also show you how to easily manage post revisions in WordPress.

Here is an overview of the topics we’ll cover in this guide:
- What is post revisions in WordPress
- Why you should use post revisions
- How to use post revisions to undo changes in WordPress
- Limiting post revisions in WordPress
- How to delete old post revisions in WordPress
- How to completely disable post revisions in WordPress
What is Post Revisions?
Post revisions is a WordPress feature that allows you to undo changes and go back to an earlier version of your posts and pages.
For each draft you are working on, WordPress automatically saves a temporary revision. This type of revision is called auto-save.
WordPress stores an auto-save every 60 seconds. It also automatically replaces the older version with the new auto-save.

The autosave feature helps you restore the content if something goes wrong before you can save it. For example, if your browser crashed or your computer hanged while writing, then you can restore your latest draft from the autosave.
WordPress also saves post revisions each time a user clicks on the save, update, or publish button. Unlike auto-saves, these revisions are permanently stored in the WordPress database.
You can locate, browse, and revert back to any of these revisions from the post edit screen.
Why You Should Use Post Revisions
Almost every WordPress user can benefit from post revisions. Writing great content requires a lot of tweaking and edits. Post revisions allow you to see your process and take a bird’s eye view of how your post has evolved.
You can then switch between different states of your draft, make changes, and make your article perfect for publishing.
For multi-author WordPress sites, post revisions allow editors to easily manage the work of multiple authors. You can see who made changes to an article, what changes they made, and so on.
That being said, let’s take a look at how to use post revisions to improve your WordPress posts and pages.
How to use Post Revisions to Undo Changes in WordPress
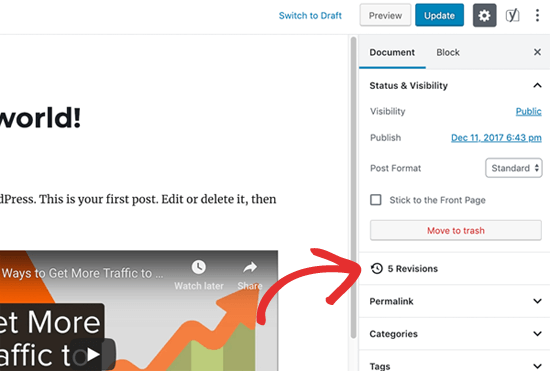
WordPress displays the number of revisions under the ‘Document’ panel on the post/page edit screen.
You can find that on the right-hand side of your post editor screen. Clicking on the ‘Revisions’ will take you to post revisions screen.

The post revision screen will show you the latest revision of the post with a scrollbar on top. Sliding the button on the scroll bar will take you to earlier revisions of the post.

Changes made in each revision will be highlighted in green and pink colors. On the top, you can see the user who made these changes, time, and other information.
WordPress will also let you know if a revision is an autosave or a draft.

You can use the next and previous buttons to move around revisions.
Plus, you can check the box on top that says ‘Compare any two revisions’. Doing so will split the scrollbar button into two, and you can take each button to a different revision and compare the difference between two distant revisions.

To restore a revision, you can simply click on Restore This Revision or Restore This Autosave button.
WordPress will restore the selected revision as your current post revision, and you can then save it as a draft.

Keep in my mind that restoring to an earlier revision will not delete the latest version of your post. Instead, WordPress will store it in the database as another revision.
Using post revisions with Classic WordPress editor
In case you haven’t upgraded your WordPress to Gutenberg and still using the Classic Editor, then you’ll find the post revisions in the publish meta box on the right panel of the post/page edit screen.

To view the post revisions, you can simply click the ‘Browse’ link next to the number of revisions. Apart from this, the post revisions work similarly in both the Classic Editor and Gutenberg.
Limiting Post Revisions in WordPress
All post revisions are stored in your WordPress database. Due to this, many users worry that too many revisions can slow down their websites.
It is not true.
WordPress skips post revisions when making database calls on the front end. It only looks for revisions on the post edit screen, or when you are actually browsing revisions.
You can still control and limit post revisions in WordPress. We’ll show you two different methods to do that you can choose one that best suits you.
1. Limit post revisions in WordPress using plugin
The easiest way to manage WordPress post revisions is by using a plugin. This allows you to control revisions from the WordPress admin area.
First thing you need to do is install and activate the WP Revisions Control plugin. For more details, see our step by step guide on how to install a WordPress plugin.
Upon activation, you need to visit Settings » Writing page and scroll down to WP Revisions Control section.

From here you need to enter the number of revisions you want to store for each post type and then click on the ‘Save Changes’ button to store your settings.
WP Revisions Control will now limit the post revisions stored in your WordPress database.
The plugin also allows you to delete revisions for an individual post. Simply edit the post where you want to delete revisions and scroll down below the editor.

You can limit the revisions for this post only or delete them by clicking on the ‘Purge these revisions’ button.
2. Limit WordPress post revisions manually
WordPress allows you to control how many revisions you want to keep for an article. To limit post revisions, simply add this code to your WordPress site’s wp-config.php file.
define( 'WP_POST_REVISIONS', 10 );
Don’t forget to replace 10 with the number of revisions you want to keep for each post.
How to Delete Old Post Revisions in WordPress
Old post revisions are perfectly harmless, and you don’t need to delete them in most cases. However, if you have a very large website with thousands of articles, then deleting old post revisions can help you reduce backup sizes.
First, you’ll need to install and activate the WP-Optimize plugin. For more details, see our step by step guide on how to install a WordPress plugin.
Upon activation, go to WP-Optimize » Database page and check the box next to ‘Clean all post revisions’ option.

Now click on the ‘Run optimization’ button to delete all post revisions. You can uninstall the plugin after you have deleted the revisions.
Once you have cleaned up revisions, feel free to uninstall and delete the plugin.
Deleting WordPress post revisions via phpMyAdmin
Advanced users can also delete WordPress posts revisions via phpMyAdmin.
First, make sure that you have created a complete WordPress database backup.
After that, simply login to your WordPress hosting control panel and click on the phpMyAdmin icon.
Next, you need to select your WordPress database from the left column. PhpMyAdmin will now display tables in your WordPress database.

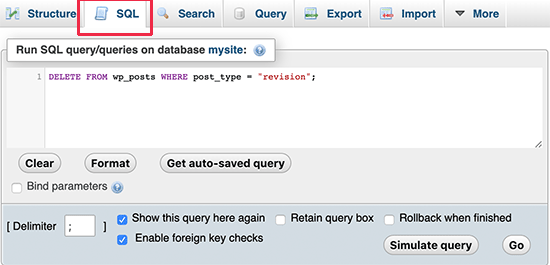
After that, you need to click on the SQL tab from the top menu.
This will load phpMyAdmin’s SQL interface. From here you can manually run commands on your WordPress database.
You need to enter the following code.
DELETE FROM wp_posts WHERE post_type = "revision";
Don’t forget to replace wp_ with your own WordPress database prefix. After that, click on the Go button to run the command.

PhpMyAdmin will now delete all revisions from your WordPress database.
Note: Deleting revisions will not stop WordPress from saving revisions for your future posts.
How to Completely Disable WordPress Post Revisions
We don’t recommend disabling WordPress post revisions. However, some users may want to disable revisions to reduce their WordPress database size.
The easiest way to do this is by installing Disable Post Revision plugin. For more details, see our step by step guide on how to install a WordPress plugin.
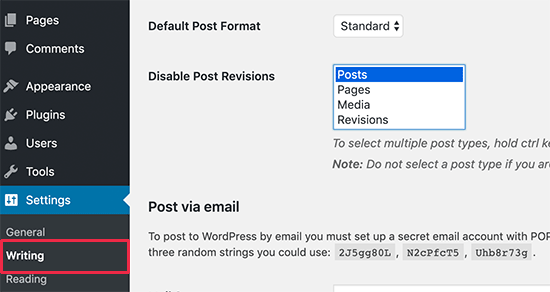
Upon activation, go to Settings » Writing page and select the post types where you want to disable revisions feature.

Don’t forget to click on the save changes button to store your settings.
If you don’t want to use the plugin, then you can also do the same thing manually by adding this code to your wp-config.php file.
define('WP_POST_REVISIONS', false );
This code disables WordPress post revisions feature on your website. It will still allow WordPress to save one autosave and one revision in your browser storage.
We hope this article helped you learn how to use WordPress post revisions to undo changes and how to manage post revisions for larger sites. You may also want to see our beginners guide on managing your editorial workflow in WordPress.
If you liked this article, then please subscribe to our YouTube Channel for WordPress video tutorials. You can also find us on Twitter and Facebook.
