How to Display Your Form in a Single Line in WordPress (Easy Way)
Do you want to display your form in a single line?
Single line forms give you more flexibility with form placement. This means you can easily add forms to high traffic areas of your site and improve your conversions.
In this article, we’ll show you how to display your form in a single line in WordPress easily.


Why Display a Single Line Form in WordPress?
Single line forms give you more flexibility when choosing where to place your forms. Since this style of form is only a single line, they don’t take up much space and can easily be integrated with your existing content.
Email newsletter sign up forms are often displayed in a single line above or below blog post content. Single-line forms also work well on landing pages, contact pages, and other important pages on your website.
Beyond generating more subscribers and leads, you can turn any kind of form into a single line form. For example, it might make sense to display your contact form in a single line to save space on the page.
That being said, let’s show you how to display a single line form on your WordPress website.
Creating Your Single Line Form in WordPress
For this tutorial, we’ll be using the WPForms plugin to create a single line form. It’s the best lead generation plugin for WordPress used by over 5 million websites.


You can use the drag and drop builder to quickly create any form for your site. Plus, it integrates with popular email marketing tools so you can easily grow your email list.
There is a premium version of the plugin with many more features, but we’ll use the lite version for this tutorial since it lets you create a simple form and connect it to Constant Contact for lead generation.
First thing you need to do is install and activate the plugin. For more details, see our beginner’s guide on how to install a WordPress plugin.
After that, go to WPForms » Add New in your WordPress admin panel and give your form a name. Then, you need to choose your form template.
We’ll select the ‘Opt-In Form’ template. Simply hover over the template and click the ‘Use Template’ button.


This brings up the drag and drop form builder.
You’ll see that the template we chose automatically includes the name and email fields and a submit button.


Every field can be edited by clicking on them and making changes in the left hand column.
You can also drag and drop the fields to change their order.


Once you’re done customizing the fields, you can display your form in a single line.
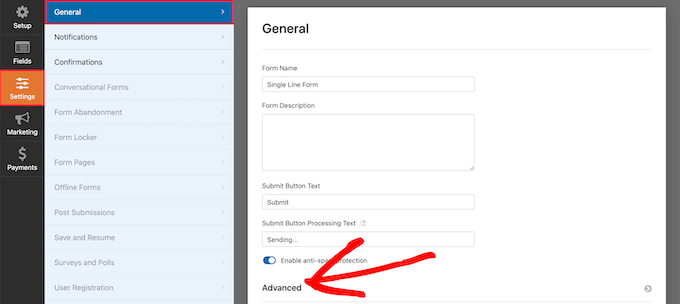
To do this, go to Settings » General and then click on the ‘Advanced’ drop down tab.


Next, type ‘inline-fields’ in the ‘Form CSS Class’ box (without quotes).
This will apply that CSS class to the form. Since WPForms includes styling for the ‘inline-fields’ class, it will automatically make your entire form display nicely on a single line.


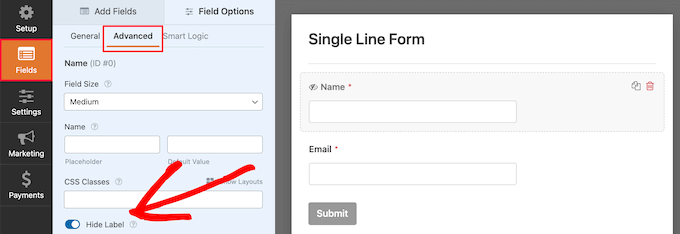
After that, you can make your form even smaller by hiding the field labels.
Simply click on the ‘Fields’ navigation option, then select the ‘Advanced’ menu option, and click the ‘Hide Label’ toggle to turn it on.


Then, you need to do the same thing for all of the form field labels.
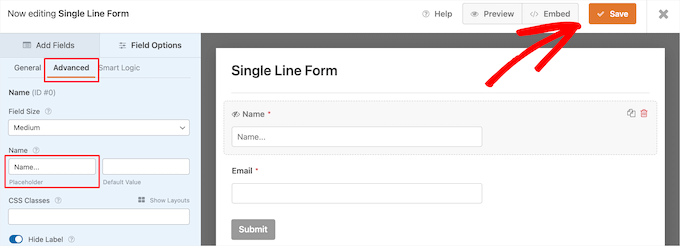
After that, in the same ‘Advanced’ section, you can enter text into the ‘Placeholder’ box.
This tells your users what each form field is for.


Once you’re done customizing your form, make sure to click the ‘Save’ button to save your changes.
If you’re using your form to generate leads, then you can connect your form to your email marketing provider. For more details, see our guide on how to create an email newsletter the right way.
Adding Your Single Line Form to Your WordPress Website
Now, it’s time to add your single line form to your website. You can add it to any page, post, or widget area.
We’re going to add it to an existing page, but the process will be similar if you’re adding it to another area of your WordPress blog.
Simply open up the page where you want the single line form to display, click the ‘Plus’ add block icon, and search for ‘WPForms’.


Then, click on the ‘WPForms’ block to add it to your site.
This brings up a drop down box to choose the single line form you created earlier.


Once you choose your form, the plugin will load a preview of your form inside the content editor. Then, click the ‘Update’ or ‘Publish’ button to make your new form live.
Now, you can visit your website to see your new form in action.


We hope this article helped you learn how to display your form in a single line in WordPress. You may also want to see our guide on how to get a free email domain, and our expert picks of the best virtual business phone number apps with free options.
If you liked this article, then please subscribe to our YouTube Channel for WordPress video tutorials. You can also find us on Twitter and Facebook.
