How to Create a Landing Page With WordPress
Do you want to create a custom landing page on your WordPress site? Landing pages help businesses convert website visitors into customers and leads. In this article, we will show you how to easily create a landing page in WordPress.

What is a Landing Page?
A landing page is a purpose-built page designed to increase sales or generate leads for a business. It is used in paid marketing, email, and social media campaigns. Users coming from these sources will land on this page first, which is why it is called landing page.
What is the difference between the homepage and a landing page?
A homepage is your website’s front page and what users will see when they enter your domain name in their browser. On the other hand, a landing page can be a standalone page where most visitors land from paid or third-party traffic sources.
A homepage is designed for visitors to engage with your website, explore other pages, browse products, or sign up. It has more links and provides users with more choices.
On the other hand, a landing page is built for conversion. It has fewer links and is designed for users to make a purchasing decision or give their information for future outreach.
Normally, your website can have only one homepage, but you can create as many landing pages as you want for different campaigns. For example:
- A landing page for your paid advertising campaigns
- Visitors coming from specific traffic sources like email list, social media, and more
- Users landing on a specific product or service page
- and many more…
That being said, let’s take a look at how to create a beautiful custom landing page in WordPress. We will show you two solutions, and you can choose the one that suits you best.
Creating a Landing Page in WordPress using Beaver Builder
Beaver Builder is one of the best WordPress landing page plugins. It allows you to easily create a landing page using ready-made templates that you can modify with simple drag and drop tools.
First, you need to do is install and activate the Beaver Builder plugin. For more details, see our step by step guide on how to install a WordPress plugin.
Upon activation, you need to visit Settings » Beaver Builder page to configure plugin settings.
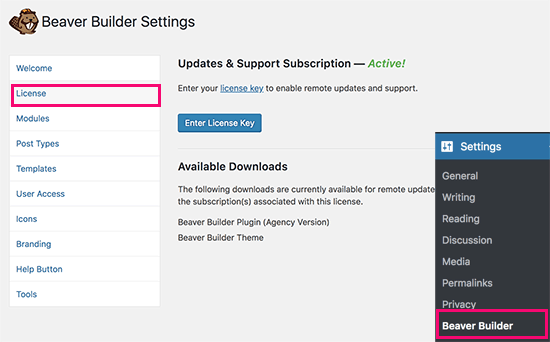
Under the License tab, click on the ‘Enter License Key’ button to add your license key. You can find this information under your account on Beaver Builder website.
Next, you need to head over to Pages » Add New page to create your first landing page. Many WordPress themes now include a page builder or a full-width template. These templates are designed to work with page builder plugins.
If your theme doesn’t have such a template, then you can create one on your own. For detailed instructions, see our guide on how to create a full width page in WordPress.
Select a page builder or full-width template from the ‘Page Attributes’ box in the right column and now save your page to apply the changes.

You are now ready to make a landing page. Click on the Beaver Builder tab above the post editor to launch the builder interface.
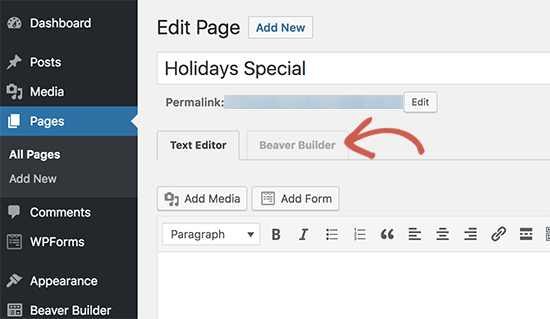
Beaver Builder will open with your existing page template. You need to click on the add button on the top right corner of the screen and switch to the templates tab.

Beaver Builder comes with several ready-made templates. Select ‘Landing Pages’ from the group drop-down menu and then choose a template that looks close to what you have in your mind.
Once you select a template, Beaver Builder will load it in the preview window.

You can now point and click on any item to edit it. You can change the text, change background color or images, adjust width and height of the rows and columns.
You can add or remove content items from your template. Simply click on the add button and switch to the rows tab. You can add either single or multiple columns.

After adding a row, switch to the modules tab. Modules are content elements that you can add to your landing page. Beaver builder comes with all the essential modules including text, headings, buttons, video, audio, animated countdown timer, and more.

Once you are satisfied with the design, you can click on the ‘Done’ button at the top and then save or publish your page.

You can now visit the page to view your landing page in action. Feel free to edit it again if you need to adjust, add, or remove anything.

Creating a Landing Page in WordPress using Leadpages
Leadpages is another easy to use platform for creating beautiful landing pages and adding them to your WordPress site.
Unlike BeaverBuilder, LeadPages is a standalone landing page builder which means you can use it with or without a WordPress site.
First, you need to visit Leadpages website and sign up for an account. After that you will see the Leadpages dashboard where you need to click on the ‘Create new Leadpage’ button.

On the next screen, you will be asked to choose a template. Leadpages comes with dozens of beautifully designed templates which are neatly organized into different categories.

Click on any template to preview it. You need to select a template that looks closest to what you have in mind and then click on the ‘Use this template’ button to continue.
This will launch the Leadpages builder interface. It is a drag and drop interface where you can just point and click on an item to edit it.
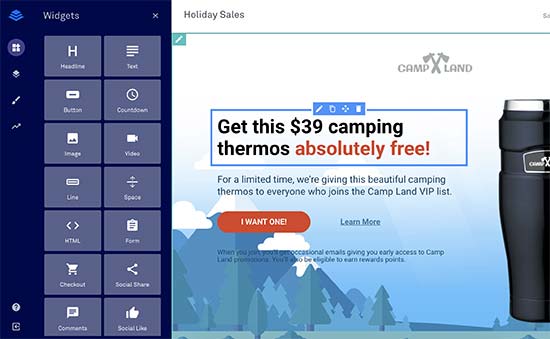
You can now point and click to edit any item on the page. You can replace images, text, background images, and more. You can also add new widgets from the left column.
You can also adjust different sections of your landing page by clicking on the page layout tab. Simply drag and drop sections to adjust them on the page. You can also add new sections or remove them.

Leadpages also connects with several third-party apps including all top email marketing services. Simply add a sign-up form to your landing page and then click on ‘Add Integration’ button.
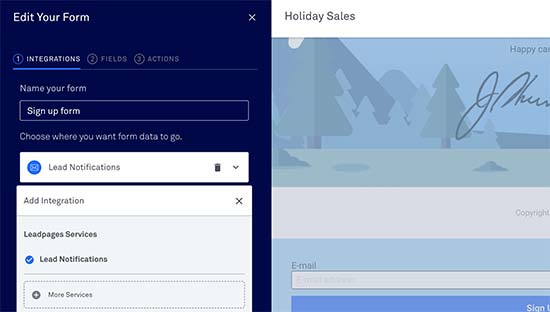
Once you are finished editing your landing page, you can click on the publish button to make it live.
After that you need to click on the ‘Publish Options’ button and switch to ‘Other publishing options’ tab. From here you can download the Leadpages WordPress plugin.

Next, you need to switch to your WordPress site to install and activate the plugin. For more details, see our step by step guide on how to install a WordPress plugin.
Upon activation, you need to visit the Leadpages menu in your WordPress admin area to login with your Leadpages account.
Once logged in, go to Leadpages » Add New page. You will be able to see your landing page listed there with few options.
You can publish this page as a normal landing page, homepage, a welcome gate, or a 404 error page. You can also choose a URL slug for your landing page.
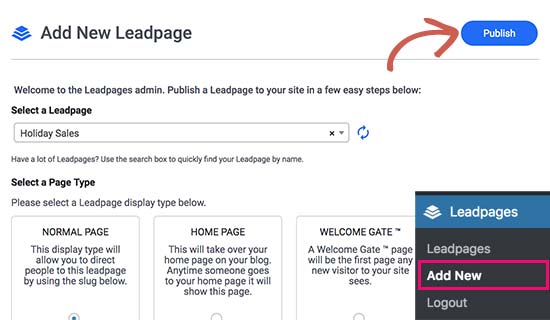
After reviewing the options, go ahead and click on the publish button. Leadpages will now publish the page on your WordPress site.
You can now visit this page on your website to see it in action. You can make any changes you want from the Leadpages website and those changes will show up on your site.
We hope this article helped you learn how to create a landing page with WordPress. You may also want to see our tips on driving more traffic to your WordPress site.
If you liked this article, then please subscribe to our YouTube Channel for WordPress video tutorials. You can also find us on Twitter and Facebook.
