
If you manage a multi-author WordPress blog or WordPress sites for clients, then you may have wondered if it was possible to clean up the WordPress admin area for your users? There are lots of things in the WordPress admin area that your users don’t need to see or use. In this article, we will show you how to hide unnecessary items from WordPress admin area.
Previously we showed you how to hide menu items from WordPress admin sidebar. However, there are many other aspects of the admin area that you may want to change. Like dashboard widgets, admin bar, post edit area, etc. You may also want to deactivate things based on user roles creating different admin interfaces for users with different roles and capabilities on your site. This is when Adminimize comes in.
Video Tutorial
If you don’t like the video or need more instructions, then continue reading.
First thing you need to do is install and activate the Adminimize plugin. Upon activation, visit Setting » Adminimize to configure the plugin settings.
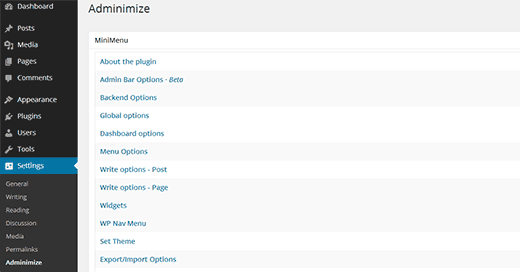
The settings page has a Mini Menu that divides the settings page into different sections for different WordPress admin screens. Clicking on each link in the mini menu will take you to its options. For each section, you will see a number of items that you can deactivate or modify. You will also notice that each option has check boxes for all WordPress user roles.

Once you have checked to deactivate a few items, you need to click on the ‘Update Options »’ button below any section to store your changes.
Please note that your changes will not be visible on the plugin’s settings page. To see your changes in action, you will need to open any other admin page in a new browser tab.
We will show you each item in the Mini Menu and how to change their settings.
Admin Bar Options
After the plugin’s about section, the first option in the mini menu is the Admin Bar Options. The admin bar is the WordPress toolbar that appears on the top of each screen when you are logged in to your WordPress site.
All the items in the admin bar can be turned off or on for each user role.

The first option allow you to hide the user menu and its subitems that appear on the top right corner of the admin bar. After that you will notice that each main menu is highlighted with the pink color. Deactivating a main menu will also hide all its sub-menus. For example, deactivating WordPress logo will also hide all the links in its sub menu.
The admin bar shows your site’s name with a drop down menu containing the link to visit your site’s front-end. Checking the site name will also hide the link to visit the site’s front-end. Among other options, you will see checkboxes to hide comments icon and +New icon.
Remember that you can also hide a sub-item. For example, if you want to keep the +New menu in the admin bar, but you want to hide pages from it, then just check the pages and deactivate it for the selective user roles.
If you only wanted to switch off admin bar, then perhaps you should take a look at how to disable WordPress admin bar for all users.
Backend Options
Not all sections in the adminimize settings screen will have checkboxes. The backend options section has a slightly different look. This section allows you to set global options for all users in the admin area.

The first option here is to configure the user info menu. This is the menu that appears on top right corner of the admin screen with a user avatar. You can choose to hide it, show user and log out, or show the logout link only. The next option is to choose where to redirect users when they click on the user info link. In order to change this, you need to first change the user info menu to anything other that default or hide. After that, you need to click on the update options button below to store your changes. Now you can change the redirection option and set it to front page of your site.
Next option is for footer which allows you to hide the footer from all admin pages.
By default when you are working on a post, the timestamp option is hidden behind an edit link next to the publish information. In order to schedule a post, you need to click on the edit link to show the timestamp.

In the backend options section, you can select activate next to the timestamp option to make it visible all the time.
Similarly, by default WordPress hides some of your categories in the categories meta box on the post edit screen. You can change this behavior by choosing activate next to the Category Height option. Doing so the category meta box will adjust the height to display all your categories.
The advice in footer option allows you to put your own text in the footer area of all WordPress admin pages. This can be used for branding, adding shortcuts, or anything you want.
The last option in the Backend Options is to set a redirection for Dashboard. To use this you need to deactivate the dashboard first. We will show you how to do that later in this article.
Global Options
The global options section allows you to activate or deactivate particular settings for specified user roles. The first option here is to show or hide the admin bar. Unlike the admin bar option section which allows you to change the menus in the admin bar, this checkbox will turn off the admin bar altogether for the selected user roles.

The Favorites section is no longer available in WordPress. The next few options are screen meta, screen options, and contextual help. This will deactivate the help and screen options section from WordPress admin pages.
Users on your WordPress site can go to their profiles and change the admin color scheme. To remove this feature, you can deactivate admin color scheme for selected user roles.
Hiding WordPress Dashboard Widgets
To change the dashboard widgets, first you need to visit the Dashboard. This will allow Adminimize to load your Dashboard widgets. After that, you need to go back to Settings » Adminimize and click Dashboard Options link from the mini menu or scroll down to Dashboard Options section. You can hide activity widget, QuickPress widget, WordPress News widget, and at a glance widget.

If you only wanted to switch off dashboard widgets, then take a look at how to remove WordPress dashboard widgets.
Menu Options
Menu options allows you to show or hide items from your WordPress menu bar.

Adminimize will show you an option for each menu item and all its sub-menu items. It will also show you menus added by your WordPress plugins and themes. You can check menus you want to deactivate for different user roles on your WordPress site.

Write Options – Post, Page, and Post Types
You can also modify the meta boxes and write panels in the WordPress post and page edit area. To do so, click on Write Options – Post or Write Options – Page from the mini menu on Adminimize settings. You can hide almost any item that appears on the write screen.

The first few options allow you to show / hide different meta boxes and sections from your post edit screen. It also allows you to hide items from Quick Edit area.
Widget Options
The next section in the Adminimize settings is Widget Options. This section allows you to show and hide items from the Widgets screen. You can show / hide widget ready areas and sidebars. You can also hide inactive widgets section along with hiding individual widgets from the list of available widgets.

WP Nav Menu Options
This section allows you to control Appearance » Menus screen. You can show / hide categories, pages, or custom link section from the menu screen. At the time of writing this article, the option to hide add new menu and the option to hide theme locations was not working. Hopefully in the next update this issue will be resolved.

Set Theme
Set theme option allows you to set a WordPress admin area color scheme for your users. Click on the load user data button and the plugin will load all your users.

Once the plugin has loaded all your users, select a user and then choose a theme from them by clicking on the default theme dropdown menu. You can also select all your users and choose a default color scheme for them.

If you only wanted to set a default scheme for your users, then take a look at how to set a default admin color scheme for new users in WordPress.
Import / Export Adminimize Settings
Adminimize allows you to easily import and export your plugin settings. Using this feature, you can apply the same settings on multiple WordPress sites. To export your settings simply click on the export button and download the .seq file containing the plugin settings.

To import settings from an Adminimize export file simply click on Choose File button under the Import. Select the .seq file you want to import and then click on Upload file and import button.
Deinstall Options
In case you want to deactivate and uninstall the plugin, this option allows you to safely disable all plugin settings. Simply deleting the plugin may not delete all the options stored in your database. To make sure that you get it all cleaned up, check the box next to Delete Options button and then click on Delete Options.

We hope this article helped you hide unnecessary items from WordPress admin area and create your own clean and customized admin panels.
If you liked this article, then subscribe to our YouTube Channel for WordPress video tutorials. You can also join us on Twitter and Google+.
