How to Properly Setup SAML Single Sign-On (SSO) in WordPress
Do you want to learn how to properly setup SAML single sign-on (SSO) in WordPress?
Adding single sign-on to WordPress lets your users quickly and securely login to your WordPress site without having to remember a username and password.
Instead they can use their Google login, Okta, or one of the many other SSO services.
In this article, we’ll show you how to properly setup SAML single sign-on in WordPress, step by step.

Why Add SAML Single Sign On to WordPress?
SAML SSO is an open protocol that lets users login to multiple websites using the same credentials. For example, with single sign on you can log in to WordPress with your Google account.
This improves user satisfaction because they won’t have to go through the password reset process and can use an existing login instead.
From a website owner’s point of view, it lets you verify your users’ identities during login through a trusted provider which improves your WordPress security.
Single sign-on is very beneficial for internal company websites. Company admin / HR team loves it because it makes it easy to onboard new team members to multiple websites.
We use single-sign on for our internal company websites at Awesome Motive, so our team members can login across multiple websites using their company Gmail account without having to remember separate passwords.

That being said, we’re going to share two different WordPress plugins that can help you setup SAML SSO in WordPress. Simply use the quick links below to choose the WordPress plugin you want to use.
Method 1. Setup SAML SSO with Google Apps Login
We recommend using the Google Apps Login plugin to easily set up SAML single sign-on in WordPress. It’s what we use here at Latest Blog so our team members can login to WordPress with their Google accounts.
The plugin is very easy to use and lets you give your users, employees, or students the option to sign in quickly with a secure Google login.
First thing you need to do is install and activate the plugin. For more details, see our step by step guide on how to install a WordPress plugin.
Once the plugin is activated, you need to navigate to the Google Cloud Platform Console to create a new API, so you can link your Google account and WordPress together.
To create the new API, first click the ‘Select a project’ drop-down menu at the top of the screen.
Your screen may look slightly different if you’ve already created a Google developer project, but you can still simply click the same drop down arrow to create a new project.

This will bring up a popup window.
Here you need to click the ‘New Project’ button in the right-hand corner.

On the next screen, you need to name your project in the ‘Project name’ box. This will help you remember the purpose of the project, but it won’t appear to your visitors.
You also need to make sure the ‘Organization’ and ‘Location’ match your website’s domain name.

After that, click the ‘Create’ button.
After the project is created, there will be a drop down notifications menu that shows your new project.
Click the ‘Select Project’ button to open up the project.

Next, click the ‘OAuth consent screen’ option in the left-hand menu.
Here you have two options to choose from. The ‘External’ option makes sense if you have a membership site or sell online courses and want to allow your users to login with Google.
The ‘Internal’ option only lets users within your company use the Google login. For this option, you need to have a premium Google Workspace account and your users need to be added as team members.
Whether you select Internal or External, every user that needs to login has to have an existing WordPress account set up under their Gmail address. Otherwise, they won’t be able to log in.
For more details, see our guide on how to add new users to WordPress.
With that said, we’ll select the ‘External’ option, since this gives us more flexibility about who can login.

After that, click the ‘Create’ button.
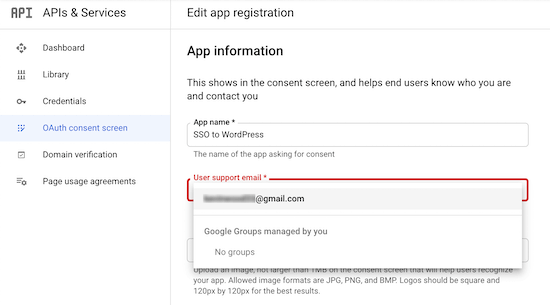
This brings you to a screen to enter your app details. First, you need to enter your ‘App name’ and select the ‘User support email’ from the drop down list.
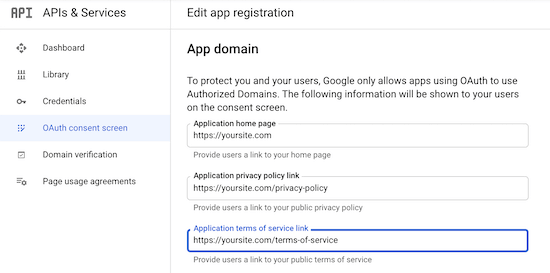
Then, enter your ‘App domain’ information. You need to fill out all three fields.
Google needs this information to make sure that your website complies with online privacy regulations and user consent.
After that, scroll down to the ‘Authorized domains’ section.
Then, click the ‘Add Domain’ button to bring up a box where you’ll enter your domain name.
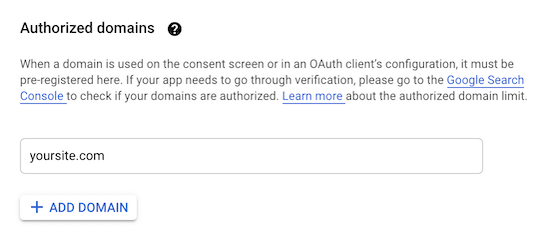
Make sure you enter your domain without the http:// or https://.
Next, enter your email in the ‘Developer contact information box’, so Google can get in touch if there’s an issue with your project.

Then, click the ‘Save and Continue’ button.
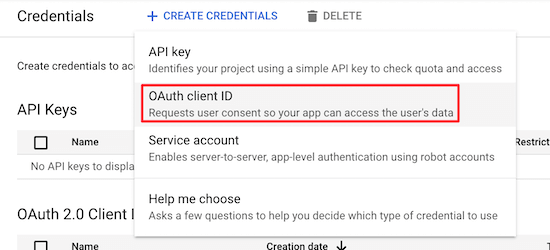
After that, click the ‘Credentials’ option in the navigation menu on the left-hand side of the page and then click ‘Create Credentials’.

This brings up a drop down menu.
You need to select the ‘OAuth client ID’ option.
On the next screen, click the ‘Application type’ drop down.
Then, select ‘Web application’ from the list.

This will bring up a form where you can give your web app a name.
The name is only for your own reference, it won’t appear to your visitors.

Next, scroll down to the ‘Authorized Javascript origins’ section.
Then, click the ‘Add URL’ button and enter the URL for your website.
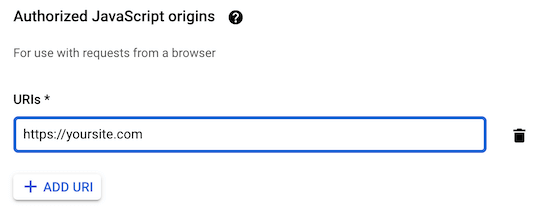
After that, click the ‘Add URL’ button in the ‘Authorized redirect URLs’ section and enter your login redirect URL.
This URL is the URL of your login page. For most WordPress websites, this will be ‘yoursite.com/wp-login.php’.
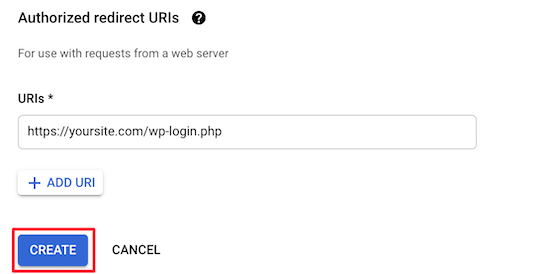
After that, click the ‘Create’ button.
This brings up a popup that has your ‘Client ID’ and ‘Client Secret’. You need to copy both of these into your favorite text editor.
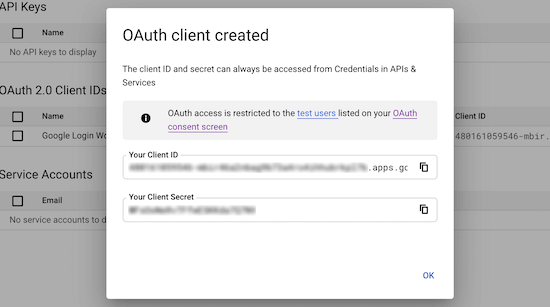
Now you need to navigate back to your WordPress admin panel and go to Settings » Google Apps Login.
On this screen, you’ll enter the ‘Client ID” and the ‘Client Secret’ strings that you copied from above.

After that, click ‘Save Changes’.
Once you’ve done that, Google single sign-on will be enabled. Now, when you or a visitor goes to the WordPress login page, they can login with their Google account in a couple of clicks.

Method 2. Setup SAML SSO with SAML Single Sign On
This method involves using the SAML Single Sign On plugin. This plugin lets you add SAML SSO to WordPress and supports a variety of different logins.
For example, you can add SSO with Google, Salesforce, Microsoft Office 365, OneLogin, Azure, and more. Since it supports various business tools, it’s more suited for businesses who want to allow only team members to log in.
First thing you need to do is install and activate the plugin. For more details, see our beginner’s guide on how to install a WordPress plugin.
Upon activation, navigate to miniOrange SAML 2.0 SSO » Plugin Configuration to bring up the plugin settings screen.
Here, you need to select your service provider. This is the service your users will be using to login.

For this tutorial, we’ll be using ‘Google Apps’, but you can select the best provider for your website. The integration steps will be similar.
In order to set up SSO with Google Apps, you need a Google Workspace account. Google Workspace is a collection of premium productivity and business tools from Google.
You also need to create a WordPress account for every user you want to give login access to. The email address for each user needs to be a Gmail account, or a team member email from Google Workspace.
For more details, see our guide on how to add new users and authors to WordPress.
Once you have a premium Google Workspace account, you can move forward with setting up SSO in WordPress.
Next, click on the ‘Service Provider Metadata’ menu option.

Then, scroll down the page until you find the chart where your ‘SP-EntityID/Issuer’ and ‘ACS URL’ are listed.
Copy both of these and paste them into your favorite text editor.

Once you’ve done that, you need to open up your Google Admin console in a new tab.
Then, go to Apps » Web and mobile apps in the left-hand navigation menu.

After that, click the ‘Add App’ drop down.
Then, select the ‘Add custom SAML app’ option.

On the next screen, you’ll need to give your app a name, and you can upload a custom logo if you’d like.
Then, click the ‘Continue’ button.

For the next step, you have two different options.
The easiest option is ‘Option 1’, all you have to do is click the ‘Download Metadata’ button. You’ll need to upload this data to WordPress at a later step.

After that, click ‘Continue’ at the bottom of the screen.
This will bring you to a screen where you can paste your ‘ACS URL’ and ‘Entity ID’ that you copied earlier.
Then, check the ‘Signed response’ checkbox.

Next, select ‘EMAIL’ from the ‘Name ID format’ drop down.
Then, click ‘Continue’ at the bottom of the screen.

On the next screen, you need to click the ‘Add Mapping’ button.
This will map the data from your WordPress login form to Google.

Next, select the ‘First name’ field in the ‘Basic information’ section and type ‘firstname’ into the ‘App attributes’ box.
Then, click the ‘Add Mapping’ button, select the ‘Last name’ field, and type ‘lastname’ into the ‘App attributes’ box.

Once you’ve done that, click the ‘Finish’ button.
Now, you’ll be taken back to the SAML app you just created. Select your app, and then click on the ‘User access’ section.

Then, in the ‘Service status’ box, click the ‘ON for everyone’ radio button.
After that, click ‘Save’.

You’ve now successfully created and enabled your SAML SSO app.
Now, go back to your WordPress admin panel and navigate to miniOrange SAML 2.0 SSO » Plugin Configuration.
On this screen, make sure that ‘Google Apps’ is selected and scroll down to the ‘Configure Service Provider’ section and click the ‘Upload IDP Metadata File/XML’ button.

Now, type ‘Google’ into the ‘Identity Provider Name’ box and click the ‘Choose File’ button.
Then, select the XML file that you downloaded earlier and click the ‘Upload’ button.

After that, click the ‘Attribute/Role Mapping’ menu option.
With the free version of the plugin, you have to keep the default attribute options.
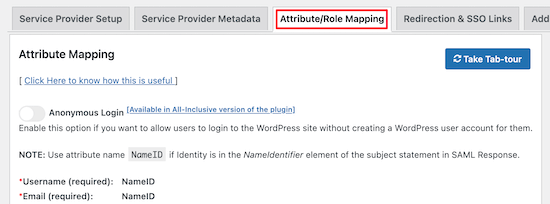
Then, scroll down to the ‘Role Mapping’ section.
Here you can change the default role, which will be assigned to all non-admin users when they login with SSO.
If it isn’t already selected, then select ‘Subscriber’ from the drop down list and click the ‘Save’ button at the bottom of the screen.

Now you need to add a simple login link to your WordPress blog.
To do this, navigate to Appearance » Widgets and look for the widget area you’d like to add your login link to. In this tutorial, we’re adding our login widget to our Right Sidebar widget area.
Under the widget area, click the ‘+’ icon to add a new block.
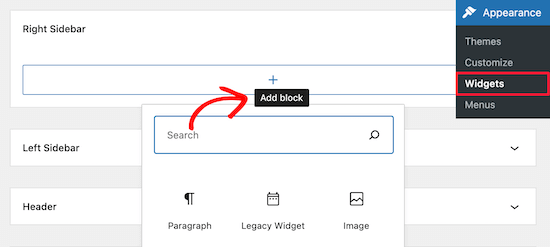
Then, type ‘Login’ into the search bar so you can find and select the ‘Login with Google’ widget.
This will insert a ‘Login with Google’ link into the widget area.

You can also add a title to the login block, if you like.
Make sure to click the ‘Update’ button before you leave the page.

Now when your users are on your website, they have the option to login with their Google accounts.
When they click the link they’ll be taken to the Google login screen to select their account.

We hope this article helped you learn how to properly setup SAML single sign-on in WordPress. You may also want to see our guide on how to get a free email domain, or our expert comparison of the best business phone services for small business.
If you liked this article, then please subscribe to our YouTube Channel for WordPress video tutorials. You can also find us on Twitter and Facebook.
