Ultimate Guide to Using MailChimp and WordPress
Are you looking to build an email list? Want to send email updates to your subscribers when you publish a new blog post? MailChimp is one of the world’s leading email service provider, and it is extremely easy to use. In this guide, we will show you how to use MailChimp and WordPress to get more subscribers.

Why Build an Email List?
More than 70% of users who abandon your website will probably never come back unless they buy something from you, or you successfully get them to subscribe to your email list.
Email is private, personal, and by far the most direct form of communication on the internet. Most people check their inbox more than their social media streams. An email will stay in the inbox unless a user takes action on it. On social media, your message will get buried into user’s timeline.
See our guide on why you should start building your email list right away.
Why Use MailChimp with Your WordPress Site?
Over the years, we have found MailChimp to be one of the most beginner friendly email marketing service. Why? Because it’s very easy to use and has tons of WordPress integrations.
It is also by far the most affordable for beginners because it is free as long as you send less than 12000 emails per month or have less than 2000 subscribers. This means you can get started right away without paying anything.
Now as your subscribers grow (more than 2000), you will be asked to upgrade your account to paid plan.
Aside from just capturing and sending emails, some other cool features of MailChimp allows you to setup RSS to email subscriptions, design beautiful email templates, set up auto-responders, and monitor the performance of your email campaigns with comprehensive analytics reports.
Getting Started with MailChimp
To connect MailChimp to your WordPress site, the first thing you will need is a MailChimp account.
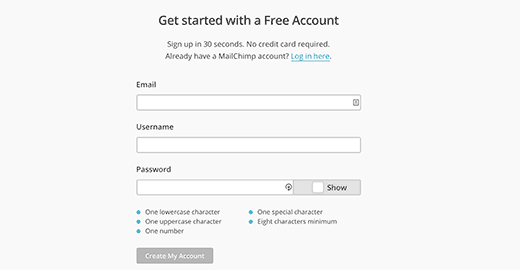
Visit the MailChimp website and click on the ‘Signup Free’ button.
Fill in your email and create a username / password for your account.

Once you are signed in, you will be redirected to your MailChimp dashboard.
Creating Your First Email List
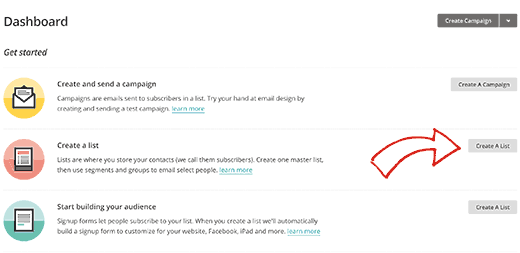
The first thing you need to do in your MailChimp account is setup an email list. On your MailChimp dashboard, click on ‘Create A List’ button.

You will be asked to provide information like the name for your email list, an email address where users can reply to, a reminder for people how they got on your list, etc. Fill the form and click on the Save button.
That’s all, you have successfully created your first email list. Now you need to connect your email list to your WordPress, so your website visitors can subscribe.
Adding MailChimp Email Signup Forms in WordPress
MailChimp comes with a built-in basic subscription form. All you need to do is go to the Lists page in your MailChimp account. Next click on the downward arrow button next to your email list and select sign up forms.

On the next page, you will see some of the form types you can generate. You need to click on the select button next to Embedded Forms.

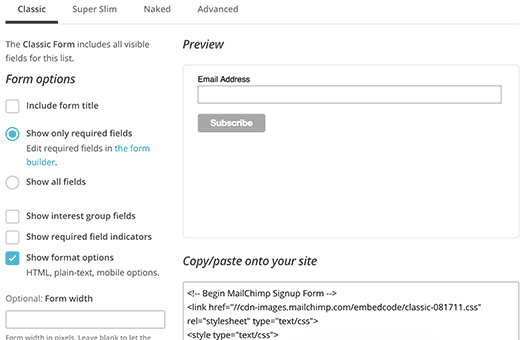
You will be taken to a settings page where you can choose what fields you want to show in your form, adjust form width and other options. When you are done, simply copy the embed code.

Now you need to visit your WordPress admin dashboard and click on Appearance » Widgets. Add a Text widget to a WordPress sidebar and paste the signup form code inside it.

That’s all. You can now visit your site and see the MailChimp signup form in action.

Adding Beautiful Signup Forms Using OptinMonster
While adding a basic MailChimp signup form in WordPress is quite easy, but getting people to join your email list is not. At WPBeginner, we use OptinMonster to build our email list. You can read all about it in this case study where we increased our email subscribers by 600% using OptinMonster.
OptinMonster (@optinmonster) allows you to add different kind of signup forms such as lightbox popup, floating footer bar, after post forms, sidebar forms, slide-in forms, and more.
You can do A/B testing, page-level targeting, choose from many different templates, and even use exit-intent.

We built OptinMonster because we needed a WordPress lead generation solution that is easy to use and deliver results.
OptinMonster works with all major email marketing providers including MailChimp.
Setting up WordPress RSS Feed Newsletter in MailChimp
Now that you have visitors subscribing to your email list, it is important that you send them regular updates.
You can always login to your MailChimp account and manually send an email to your subscribers, but with MailChimp you can also setup automated campaigns that send your latest blog posts via email. This is called a RSS newsletter. (See our guide on RSS Feeds in WordPress.)
If you have been using FeedBurner to send emails to your RSS subscribers, then you need to read why you should stop using FeedBurner and move to Feedburner alternatives. It also shows how to move your FeedBurner subscribers to MailChimp.
To setup an RSS to Email campaign, first you need to login to your MailChimp account and then click on Campaigns » Create Campaign.

On the next page, MailChimp will show you different type of campaigns you can create. You need to choose RSS-Driven Campaign.

Enter your RSS feed URL and select when you want to send the automated email. You can send daily, weekly, or even monthly emails. You can also choose the time for your email. When you have picked your settings, click on the Next button at the bottom right corner of the screen to continue.

MailChimp will now ask you to select a list. Select your list and click on the next button to continue to the campaign info.
First you need to provide a name for your campaign. After that you will notice that MailChimp has automatically filled in most of the fields for you. These default settings would work for most websites. However feel free to customize it to fit your needs. Click on the Next button to continue.

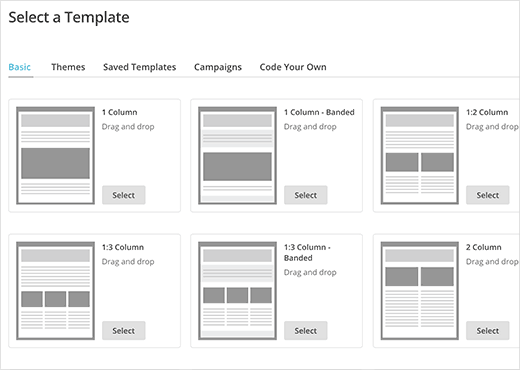
In the next step, you will need to choose a template for your email. MailChimp comes with many different options for that. Choose the one that best suits you by clicking on the select button next to it.

MailChimp will allow you to fine-tune your email design. You can add your logo, a header image, change the text to your own site’s requirements. Mainly you need to add RSS Header and RSS Items box to your email template.

Click on the next button when you are done. Lastly click on Save and exit at the top right corner of the screen.
That’s all you have successfully created your WordPress RSS Feed Newsletter with MailChimp.
We hope this article helped you learn how to use MailChimp with WordPress. Now that you have started building your email list, you may want to take a look at our guide on how to grow your email list.
If you liked this article, then please subscribe to our YouTube Channel for WordPress video tutorials. You can also find us on Twitter and Facebook.
