How to Add Equipment Rentals to Your WooCommerce Store
Do you want to add equipment rentals to your WooCommerce store?
By renting equipment to your customers, you can keep making money from the same product. You can also connect with a new audience who want to rent products rather than buy them.
In this article, we will show you how to add equipment rentals to your WooCommerce store.


Why Add Equipment Rentals to Your WooCommerce Store?
By renting equipment to your customers, you can buy a product once and then turn it into an ongoing revenue stream.
If you already have a WooCommerce store selling digital products or physical items, then equipment rentals can be another way to make money.
For example, if you sell party hats and paper plates, then your existing customers might also be interested in larger party equipment rentals, such as a bouncy castle or audio speakers.
You might also be looking to start a completely new equipment rental business. By creating a WooCommerce store that’s optimized for SEO, you can help potential customers discover your business.
Even better, customers can browse your catalog and reserve equipment online. This convenient customer experience will keep people coming back to your equipment rental business rather than switching to a competitor.
With that in mind, let’s see how you can add equipment rentals to WordPress.
How to Add Equipment Rentals to Your WooCommerce Store
In this guide, we are going to assume you already have a WooCommerce store. If you don’t, then you can see our complete guide on WooCommerce made simple.
The easiest way to add equipment rentals to your store is by using Bookings for WooCommerce. This WooCommerce plugin allows you to turn any WooCommerce product into a bookable item that customers can rent for a certain number of days or hours.


You can also create additional services, such as cleaning and delivery fees, and then add them to your equipment rentals.
How to Create a Bookable Product in WooCommerce
First, you will need to install and activate the Bookings for WooCommerce plugin. If you need help, then please see our guide on how to install a WordPress plugin.
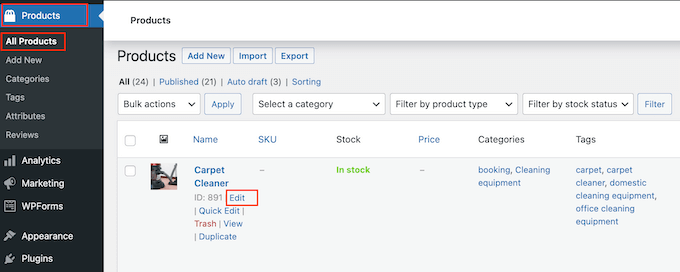
Upon activation, you can turn any WooCommerce product into a bookable product. If you have already added the product to your online store, then simply go to Products » All Products.
Here, simply hover over the item that you want to turn into a bookable product, and click on the ‘Edit’ link when it appears.

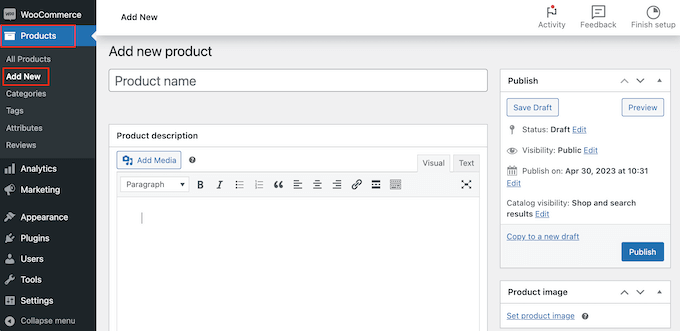
You can also add the equipment as a new product by going to Products » Add New. Here, you can type in the product’s name, upload a photo, add product categories and tags, type in a description, and more.
For more information on how to set up a WooCommerce product, please see our WooCommerce made simple guide.

No matter whether you create a new product or edit an existing one, you can turn it into a bookable product in exactly the same way.
Simply scroll to the Product Data box and open the dropdown menu that shows ‘Simple product’ by default.


You can now select ‘Booking Product.’ This gives you access to lots of new settings where you can configure the bookable product.
Set How Many Units Customers Can Rent
You can either offer a set number of units or let the customer choose how many units to rent, using the ‘Quantity’ dropdown.
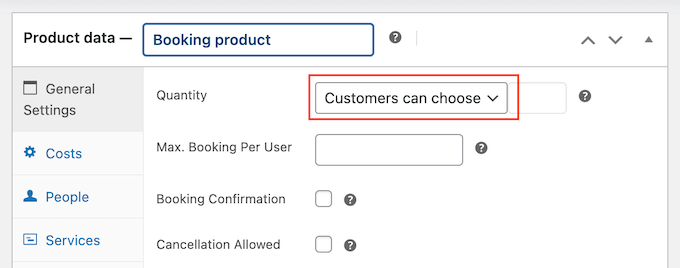

To let customers rent multiple units, select ‘Customer can choose.’
By default, customers can rent as many units as they want, but you can also add a limit. If a customer types in a higher number, then WooCommerce will show an error message.
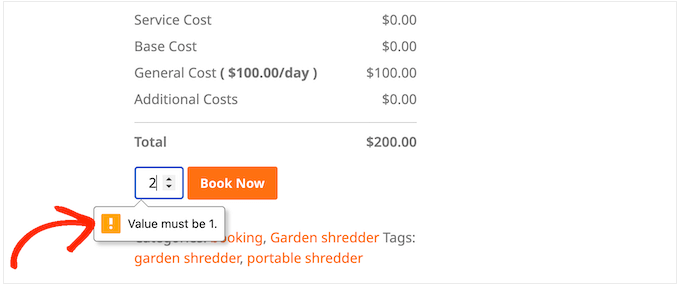

This is useful if you have limited stock or equipment that’s in high demand.
To set a limit, type a number into the ‘Max Booking Per User’ field.


Another option is defining how many units the customer can book. For example, if you rent large or expensive equipment such as heavy farming machinery, then customers may only need to book a single unit.
By setting the quantity in advance, you can remove a step from the booking process and improve the customer experience.


Simply go ahead and open the ‘Quantity’ dropdown and then choose ‘Fixed Unit.’
Now, type in the number you want to use.


Require Admin Approval For Equipment Rentals (Optional)
Next, you can decide whether to approve all rental requests automatically or put them on hold until you can manually approve them.
If you have a smaller inventory, then requiring approval can help you avoid rental overlap. It can also help you spot any problems with rental requests before you take any payments.
If you enable admin approval, then you will get a notification every time someone submits a rental request.
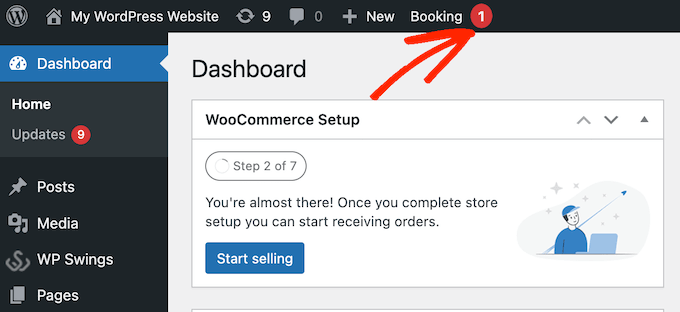

Click on this notification, and you will go to WooCommerce » Orders.
Here, you will see all the orders on your WordPress website, with any new bookings marked as ‘On hold.’


You can now click on a new order to see all the information about that booking.
If you want to change the order status, then you need to open the ‘Status’ dropdown and choose an option from the list.
For example, if you are approving the booking, then you might select Pending Payment, Completed, or Processing, depending on your workflow.


With that done, click on ‘Update’ to save your changes.
As you can see, admin approval gives you more control over your equipment rentals. To require approval, check the box next to ‘Booking Confirmation.’


Offer Hourly or Daily Equipment Rentals in WooCommerce
By default, customers can rent your equipment for one or more days. However, sometimes you may want to rent equipment based on hours.
To make this change, just open the ‘Booking Unit’ dropdown and select ‘Hour(s).’


You can then choose the start and end time for the booking period, using the ‘Daily booking…’ dropdown menus.
In the following image, customers can only rent equipment between 9 AM and 5 PM.


After making this change, WooCommerce will add a section where customers can choose a start and end time.
This is perfect for equipment that people only need for a very short period of time. For example, if you provide party equipment rental, then customers may only need the party supplies for a few hours.


Add Base and Additional Costs
When you are happy with the information you have entered so far, you need to click on the ‘Costs’ tab.
To start, just type in the Booking Unit Cost, which is the price of booking a single unit.
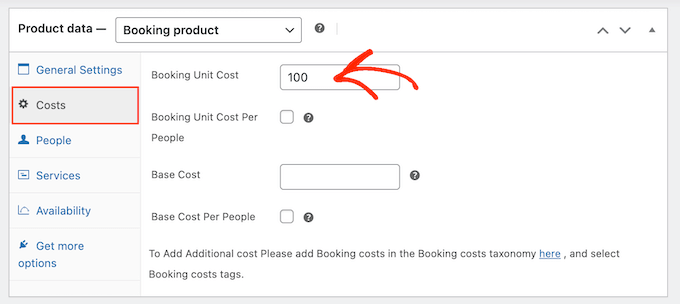

After that, you can add an optional additional cost by typing into the ‘Base Cost’ field.
This might be a booking fee, cleaning fee, or any other cost linked to renting the equipment.


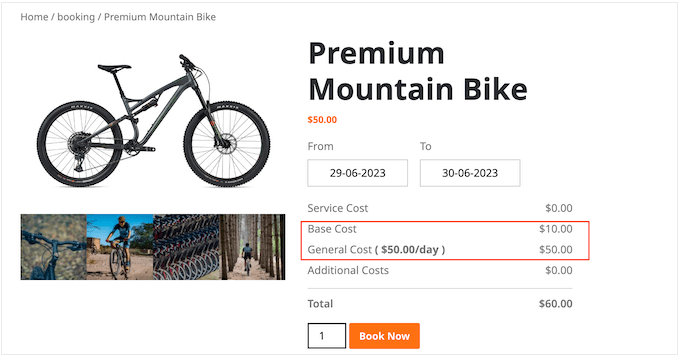
If you add a base cost, then customers will see it as part of the cost breakdown.
In the following image, the product is $50 to rent per day, with a base cost of $10.

Depending on the kind of equipment you rent, you may want to multiply the fee based on how many people plan to use the equipment. This can help you cover additional wear and tear when lots of people use the same product.
To multiply the price based on people, start by checking the boxes next to ‘Booking Unit Cost Per Person’ and ‘Base Cost Per People.’


With that done, click on the ‘People’ tab.
Here, you need to check the box next to ‘Enable People Option.’


With that done, customers will see a new field where they can type in how many people plan to use the equipment.
WooCommerce will also show this information in its cost breakdown.


You may also want to set the minimum and maximum number of people who can use the equipment in a single booking. This can help to avoid customers misusing your equipment.
For example, you may not want an entire workforce to use the same product.
If you have large equipment that’s expensive to deliver or clean, then setting a minimum number of people can help to keep your profit margins healthy.
To set these limits, simply type numbers into the ‘Minimum No. of People’ and ‘Maximum No. of People’ fields.


How to Publish Equipment Rentals to Your WooCommerce Store
Although there are some extra settings you may want to configure, this is all you need to add equipment rentals to your WooCommerce store.
With that being said, you can click on ‘Update’ or ‘Publish’ to make the product live on your WooCommerce website. Now, people can rent this equipment directly from the WooCommerce product page.
How to Set Up Services and Additional Costs for Your Equipment Rental Store
Sometimes, you may want to create additional costs and services for your equipment rental store. For example, you might offer to deliver the equipment for an extra fee.
With that in mind, let’s see how you can set up additional costs and services for your WooCommerce store.
How to Add Additional Costs in WooCommerce
Additional costs are fees that WooCommerce adds to one or more products automatically. This feature is useful if there are different costs associated with different pieces of equipment.
For example, you may need to refuel some products after use, while others might need fresh oil.
By adding these costs in the WordPress dashboard, you can easily apply them to different products. It also provides a single location where you can change the cost.
For example, if petrol gets more expensive, then you can update your Refueling cost once, and this change will be applied across your entire online marketplace or store.


As you can see in the image above, additional costs simply appear in the cost breakdown as ‘Additional Costs.’ If you want to give the shopper some more information about these charges, then we recommend creating a service instead.
To register an additional cost, you need to go to WP Swings » Bookings for WooCommerce. Here, simply click on ‘Configuration Settings,’ followed by ‘Additional Costs.’
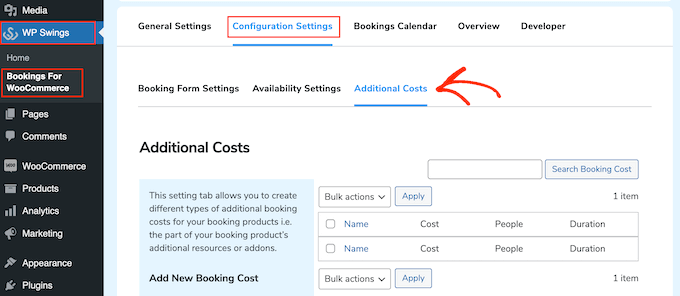

To start, type in a name for the additional cost. This is just for your reference, so you can use anything you want.
After that, you need to type in the slug you want to use for the additional cost.


With that done, you can type in an optional description. This typically won’t appear on your website, but some WooCommerce themes show it.
Next, simply type the cost into the ‘Booking Cost’ field.


By default, the additional cost gets added to an order once.
However, you can multiply the additional cost based on the booking duration or how many people plan to use the equipment. To do this, click to activate the ‘Multiply by No. of People’ or ‘Multiply by Duration’ toggles.


When you are happy with the information you have entered, simply type in ‘Add New Booking Cost.’
To create more additional costs, simply repeat the same process described above.


With that done, you can add this cost to any WooCommerce product.
Simply open the product for editing, and then scroll to the ‘Additional Costs’ box.
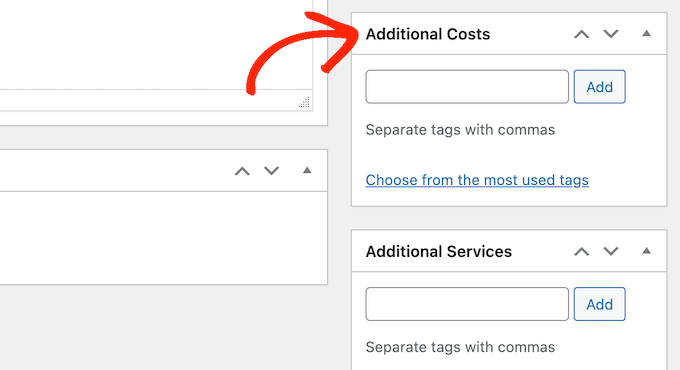

You can now type in the name of the additional cost.
When the right option shows up, give it a click and then select ‘Add.’
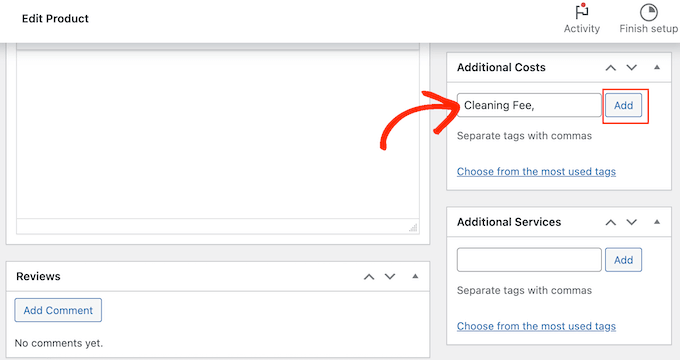

You can click on ‘Update’ or ‘Publish’ to save your changes. Now, when someone rents this equipment, the additional cost will be applied automatically.
How to Create Additional Services in WooCommerce
You can also create additional services. Unlike additional costs, the name of the service will appear in the cost breakdown.


This helps customers understand your extra fees, so we recommend using services for more expensive charges. It’s also a good idea to use services if you need to add multiple charges to an order so that customers can see a detailed cost breakdown.
You can also make services optional, so the customer can choose whether to add them to the order. This allows you to offer premium additional services such as next-day delivery.
To add services to your WooCommerce store, you need to go to WP Swings » Bookings for WooCommerce. Here, click on ‘Configuration Settings,’ followed by ‘Additional Services.’


You can now type a name for the service into the ‘Name’ field.
This will be shown to customers, so you will want to use something that helps shoppers understand the extra charge.


After that, you have to type in a slug, an optional description, and how much the service will cost by following the same process described above.
Again, you can choose whether to multiply the fee based on the duration of the booking or the number of people who plan to use the equipment.


You can also make a service optional.
This means customers can check a box to add the service to their order.


This gives shoppers more control over how much it costs to rent equipment from your WooCommerce store.
To make a service optional, simply click to enable the ‘If Optional’ toggle.
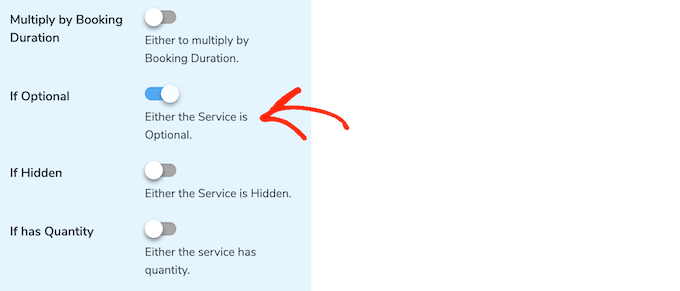

Another option is to make the service ‘hidden.’
Hidden services simply appear on the product page as ‘Service Cost.’


To make a service hidden, click to activate the ‘If Hidden’ toggle.
Next, you may want to enable the ‘If has Quantity’ slider. This allows shoppers to add the same service to their order multiple times.
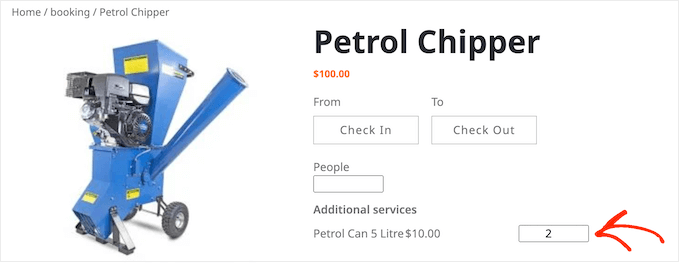

After clicking to enable the ‘If has Quantity’ slider, you may want to set a minimum and maximum quantity.
Simply type a number into the ‘Minimum Quantity’ and ‘Maximum Quantity’ fields.


When you are happy with the information you have entered, click on ‘Add New Booking Service.’
To add more services to your online store, simply follow the same process described above.
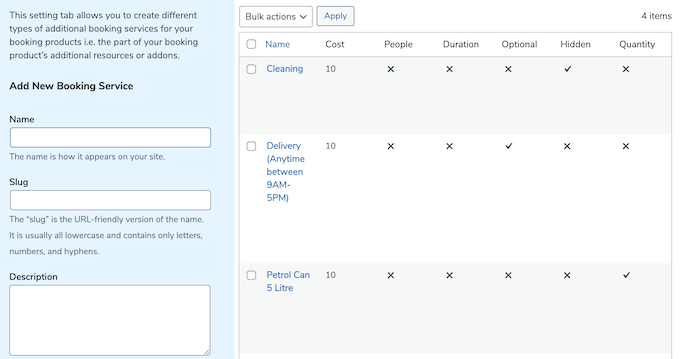

When it’s time to add a service, simply open the product for editing.
Then, just scroll to the ‘Additional Services’ box.


You can now type in the name of the additional service you want to add.
When the right option shows up, simply select it and then click on the ‘Add’ button.


With that done, click on ‘Update’ or ‘Publish’ to save your changes.
How to Manage Equipment Rentals on Your WooCommerce Store
After adding equipment to your website, you will need a way to manage your rental bookings.
Every time you get a new booking, you will see a notification in the WordPress toolbar.


Simply click on this notification to see all your bookings.
You can reach the same screen by going to WooCommerce » Orders.


To see more information about an order, go ahead and click on it. This takes you to a screen where you can see detailed information about the order and the customer, including their email address and phone number.
You can also change the order status, including canceling or refunding the rental request.


The Bookings for WooCommerce WordPress plugin also comes with a calendar that shows all your bookings at a glance.
To see this calendar, simply head over to WP Swings » Bookings For WooCommerce. Then, click on the ‘Bookings Calendar’ tab.


We hope this tutorial helped you learn how to add equipment rentals to your WooCommerce store. You may also want to learn how to create an email newsletter or check out our expert picks for the best live chat software for small businesses.
If you liked this article, then please subscribe to our YouTube Channel for WordPress video tutorials. You can also find us on Twitter and Facebook.
