How to Add Spin to Win Optins in WordPress and WooCommerce
Do you want to add spin to win optin to your WordPress site or WooCommerce store? A spin to win optin adds gamification to your sign up forms.
You can use it to share discounts, special offers, and perks as a reward. This kind of optins are proven to increase engagement and sales.
In this tutorial, we’ll show you how to easily add spin to win optin to your WordPress site or WooCommerce store.

What is Spin to Win Optin?
Spin to Win optin is a signup form or a discount coupon wheel which adds gamification to your website. Your users play a game to win discounts, unlock special offers, or access downloads after playing the game.

Case studies have shown that gamified optins get conversion rates as high as 30% or more.
The reason for that is quite simple. These gamified optins are fun, interactive, and instantly get users’ attention.
With game rewards and coupons, you also encourage users to complete the game they started by using the reward they have earned (i.e making a purchase using a discount they won).
That being said, let’s see how you can easily add spin to win optins in WordPress and WooCommerce.
Install and Activate OptinMonster in WordPress
For this tutorial, we’ll be using OptinMonster which is the best lead generation software on the market. It helps you grow your email list and convert website visitors into paying customers.
Note: Our founder Syed Balkhi first built OptinMonster to help grow our own subscribers and sales. Now it’s a premium plugin that’s used by hundreds of thousands of websites.
First, you need to visit the OptinMonster website and sign up for an account.

OptinMonster is a paid service, and you’ll need their ‘Growth’ plan to access the ‘Coupon Wheel Campaigns’ feature.
After that, you need to install and activate the free OptinMonster plugin on your WordPress website. For more details, see our step by step guide on how to install a WordPress plugin.
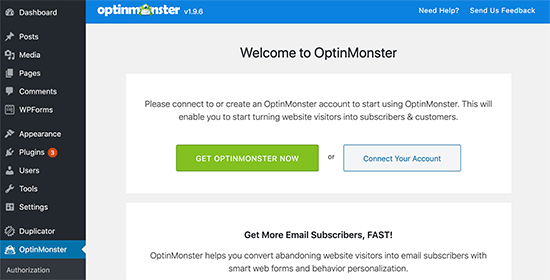
The plugin connects your WordPress website to the OptinMonster app. Upon activation, click on the OptinMonster menu from the admin sidebar to connect your account.
Creating a Spin to Win Wheel Campaign
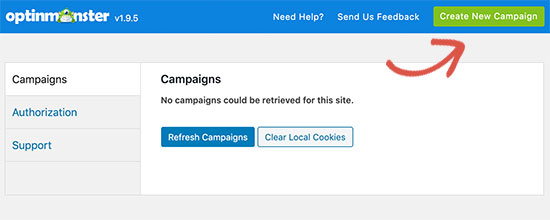
After connecting WordPress to your OptinMonster account, you need to click on the ‘Create New Campaign’ button to create your first spin to win optin.
This will take you to the OptinMonster website.
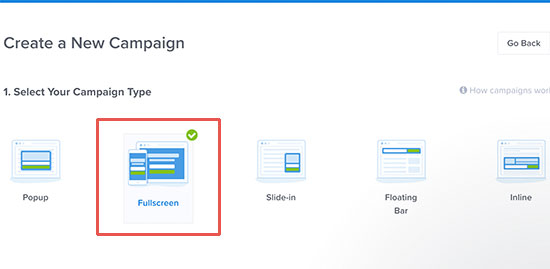
First, you need to choose Fullscreen as your campaign type.
Next, you need to select a campaign template. You’ll need one of the Wheel templates to create a ‘spin to win’ campaign.

Once you select a campaign, you’ll be asked to provide a name for your template and select a website where you’ll run the campaign.
After that, you will see the OptinMonster campaign builder interface.
From here you can change your campaign design, colors, fonts, etc. You can simply point and click on any item to edit its appearance.
Go ahead and click on the gamified wheel element to see the options to change its colors.
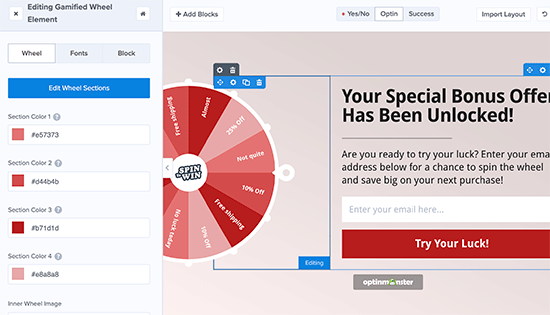
Next, you need to click on the ‘Edit Wheel Sections’ button to edit the values of the coupon wheel sections.

This allows you to add coupon codes and special offers to the wheel. You can select how often you want an option to win by adding a win percentage value.
Feel free to experiment around with colors, copy, button, and other things. Once you are done, click on the Save button at the top to save your changes.
Choose When to Show The Spin Wheel
Next, you need to select when you want your spin to win the campaign to be displayed on your website or online store.
OptinMonster gives you powerful targeting and display options that allow you to trigger the spinner anywhere and at any time on your website.
Simply switch to the ‘Display Rules’ tab in the OptinMonster dashboard. From here, you can select different display rulesets for your campaign.
For example, you can use exit intent ruleset to launch the spinner campaign when a user is about to leave your website.

You can also combine different rulesets. For example, you can set another rule to launch the campaign on specific pages.
After adding display rules, click on the next step button.
Next, you’ll be asked to select a view. You need to select the Optin view and click on the ‘Next step’ button.
Once you’re done, you’ll see a summary of your display rules. You can now click on the Save button at the top to store your changes.
Adding the Spin Wheel to Your Website
Now that your spin wheel campaign is almost ready, let’s add it to your website.
First, you need to publish your campaign. From the OptinMonster dashboard, switch to the ‘Publish’ tab and check the toggle next to the ‘Status’ option.
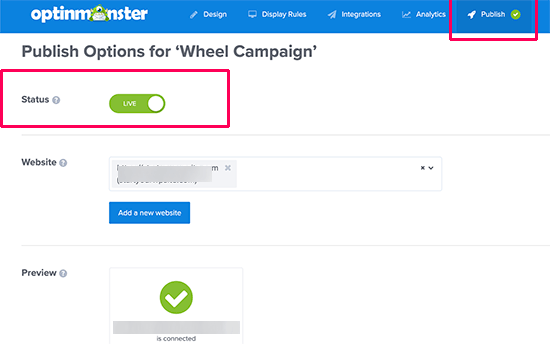
Don’t forget to click on the Save button to store your changes.
You can now visit your WordPress website and click on the OptinMonster menu item. You should now see a list of campaigns you have created with OptinMonster.

You’ll see your recently created spin to win wheel campaign with the Live status. If you don’t, then click on the Refresh Campaigns button to fetch data from OptinMonster website.
To see a live preview of your campaign, you can visit your website in a new incognito browser window. Based on your display rules, you’ll see the spin to win wheel popup on the screen.
We hope this article helped you add a spin to win optin to your WordPress website or WooCommerce store. You may also want to see our article on how to how to add a Facebook giveaway in WordPress to boost engagement.
If you liked this article, then please subscribe to our YouTube Channel for WordPress video tutorials. You can also find us on Twitter and Facebook.
