How to Customize Colors on Your WordPress Website
Do you want to customize colors on your WordPress website?
Colors play a vital role in making your website aesthetically pleasing and establishing its brand identity. Luckily, WordPress makes it super easy to customize colors across your entire site.
In this article, we will show you how to easily customize colors on your WordPress website, including background, header, text, and link colors.


What Is Color Theory?
Before you can start customizing colors on your WordPress website, it is important to understand color theory.
Color theory is the study of colors and how they work together. It helps designers create color combinations that complement each other.
When designing a website, you need to choose colors that look good together. This will make your website look more attractive to your visitors, which can improve user experience and increase engagement.
Different colors can create different emotions and feelings in people, and color theory can help you choose the right combination for your website.
For instance, red is often used to represent food and restaurants. On the other hand, blue is usually used on banking and financial websites.
That is because red can create feelings of warmth, energy, and passion, whereas blue signifies trust, security, and calmness.


Apart from complementing colors, you can also use color contrast to draw attention to important areas of your WordPress blog.
This allows you to make your content more readable, establish a strong brand identity, and create a specific mood on the website.
What Are WordPress Themes, and Can You Change Theme Colors?
WordPress themes control how your website looks to the user. A typical WordPress theme is a set of pre-designed templates you install on your website to change its appearance and layout.
Themes make your website more attractive, easier to use, and increase engagement.


You can also create your own themes from scratch using plugins like SeedProd and the Thrive Theme Builder.
With WordPress, you can easily customize themes and change their background, font, button, and link colors.
However, keep in mind that some themes come with pre-defined color choices, while others offer more flexibility to choose your own.
That being said, let’s see how you can easily customize colors in WordPress.
- How to Customize Colors in WordPress
- How to Change the Background Color in WordPress
- How to Change the Header Color in WordPress
- How to Change the Text Color in WordPress
- How to Change the Text Selection Color in WordPress
- How to Change the Link Color in WordPress
- How to Change the Admin Color Scheme in WordPress
How to Customize Colors in WordPress
You can customize colors in WordPress using many different methods, including the theme customizer, the full site editor, custom CSS, page builder plugins, and more.
Change Colors Using the Theme Customizer
It is super easy to change colors using the built-in WordPress theme customizer.
First, visit the Appearance » Customize page from the admin sidebar.
Note: If you cannot find the ‘Customize’ tab in your WordPress dashboard, then this means that you are using a block theme. Scroll down to the next section of this tutorial to find out how to change colors in a block theme.
For this tutorial, we will be using the default Twenty Twenty-One theme.
Remember that the theme customizer may look different depending on the theme you are currently using.


For example, the Twenty Twenty-One theme comes with a ‘Colors and Dark Mode’ panel that allows users to select a background color and customize dark mode.
After opening the panel, simply click on the ‘Select Color’ option. This will open up the Color Picker, where you can choose your preferred background color.
Once you are done, don’t forget to click the ‘Publish’ button at the top to save your changes and make them live on your website.


Change Colors in the Full Site Editor
If you are using a block-based theme, then you won’t have access to the theme customizer. However, you can use the full site editor (FSE) to change colors on your website.
First, head to the Appearance » Editor screen from the admin sidebar to launch the full site editor.
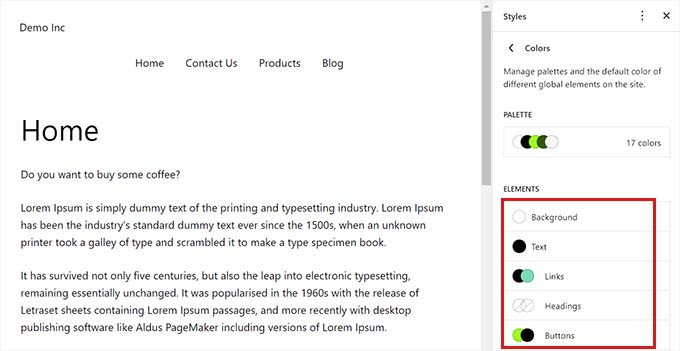
Now, you have to click on the ‘Styles’ icon in the top-right corner of the screen.


This will open the ‘Styles’ column, where you need to click on the ‘Colors’ panel.
You can change the theme’s background, text, link, heading, and button colors from here.


Once you are done, click the ‘Save’ button to store your settings.
Change Colors Using Custom CSS
CSS is a language that you can use to change the visual appearance of your website, including its colors. You can save custom CSS in your theme settings to apply your customizations to your entire site.
However, the custom CSS code will no longer apply if you switch themes on your website or update your existing theme.
That’s why we recommend using the WPCode plugin, which is the best WordPress code snippets plugin on the market. It is the easiest way to add custom CSS code, and it will allow you to safely customize colors on your WordPress website.
First, you will need to install and activate the WPCode plugin. For more instructions, please see our beginner’s guide on how to install a WordPress plugin.
Note: There is also a free version of WPCode that you can use. However, we recommend upgrading to a paid plan to unlock the full potential of the plugin.
Once you have activated WPCode, you need to visit the Code Snippets » + Add Snippets page from the admin sidebar.
Simply click the ‘Use snippet’ button under the ‘Add Your Custom Code (New Snippet)’ heading.


Once you are on the ‘Create Custom Snippet’ page, you can start by typing a name for your code.
After that, just select ‘CSS Snippet’ as the ‘Code Type’ from the dropdown menu.


Next, you must add the custom CSS code in the ‘Code Preview’ box.
For this section, we are adding custom CSS code that changes the text color on the website:
p { color:#990000; }


Once you have done that, scroll down to the ‘Insertion’ section.
Here, you can choose the ‘Auto Insert’ option if you want the code to be executed automatically upon activation.
You can also add a shortcode to specific WordPress pages or posts.


Once you are done, simply scroll back to the top of the page and toggle the ‘Inactive’ switch to ‘Active’.
Finally, you need to click the ‘Save Snippet’ button to apply the CSS code to your website.


Change Colors Using SeedProd
You can also customize colors using the SeedProd plugin.
It is the best WordPress page builder on the market that allows you to create themes from scratch without using any code.
First, you need to install and activate the SeedProd plugin. For more details, you can read our beginner’s guide on how to install a WordPress plugin.
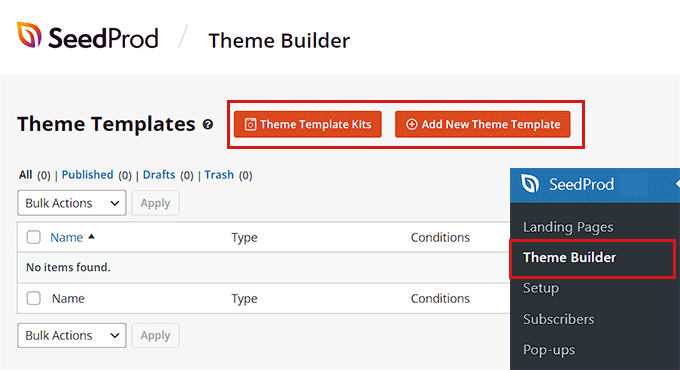
Upon activation, head to the SeedProd » Theme Builder page from the WordPress admin sidebar.
From here, click on the ‘Theme Template Kits’ button at the top.
Note: If you want to create your own theme from scratch, then you will need to click on the ‘+ Add New Theme Template’ button instead.


This will take you to the ‘Theme Template Kit Chooser’ page. Here, you can choose from any of the pre-made theme templates offered by SeedProd.
For more details, see our tutorial on how to easily create a WordPress theme without any code.


After choosing a theme, you will be redirected to the ‘Theme Templates’ page.
Here, you need to toggle the ‘Enable SeedProd Theme’ switch to ‘Yes’ to activate the theme.
Now, you must click the ‘Edit Design’ link under any theme page to open up the drag-and-drop editor.


Once you are there, click the gear icon at the bottom of the left column.
This will direct you to the ‘Global CSS’ settings.


From here, you can customize the colors of your website background, text, buttons, links, and more.
Once you are happy with your choices, click on the ‘Save’ button to store your settings.


How to Change the Background Color in WordPress
All WordPress themes come with a default background color. However, you can easily change it to personalize your website and improve its readability.
If you are using a block theme, then you will have to change the background color using the full site editor.
First, you must head to the Appearance » Editor screen from the admin sidebar.
Once the full site editor has launched, click on the ‘Styles’ icon in the top-right corner of the screen.
After that, simply click on the ‘Colors’ panel to open up additional settings


In the ‘Colors’ panel, you can now manage the default color of different elements on your website.
Here, you need to click on the ‘Background’ option under the ‘Elements’ section.


Once the ‘Background’ panel has expanded, you can choose your website background color from here.
All WordPress themes offer a number of default website colors that you can choose from.
However, if you want to use a custom color, then you need to click on the Custom Color tool.
This will open up the Color Picker, where you can select a color of your choice.


You can also use gradient colors for your website background.
For this, you will first need to switch to the ‘Gradient’ tab at the top.
Next, you can choose a default gradient from the theme or select your own gradient colors with the help of the Color Picker tool.


Once you are done, don’t forget to click on the ‘Save’ button to store your settings.
You can also change your website’s background using the theme customizer, SeedProd, and custom CSS.
For more detailed instructions, you may want to see our guide on how to change the background color in WordPress.
How to Change the Header Color in WordPress
Many WordPress themes come with a built-in header at the top of the page. It usually contains important page links, social icons, CTAs, and more.


If you are using a block theme, then you can easily customize the WordPress header using the full site editor.
First, you need to visit the Appearance » Editor screen from the admin sidebar to launch the full site editor. Once there, select the ‘Header’ template at the top by double-clicking on it.
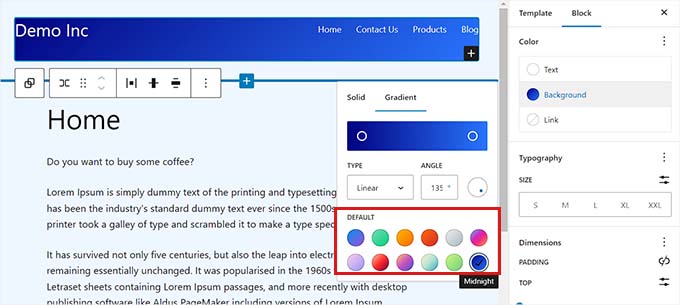
From here, simply scroll down to the ‘Color’ section and click on the ‘Background’ option.


This will open a popup where you can choose a default color for your header.
You can also select a custom color by opening the Color Picker tool.


To customize your header using a color gradient, you need to switch to the ‘Gradient’ tab.
After that, you can choose a default gradient option or customize your own using the Color Picker.


Finally, click on the ‘Save’ button to store your settings.
If you want to change the header color using the theme customizer or additional CSS, then you may want to read our beginner’s guide on how to customize your WordPress header.
How to Change the Text Color in WordPress
Changing the text color can help improve the readability of your WordPress blog.
If you are using a block theme, then you will have to change the text color using the full site editor.
You can start by visiting the Appearance » Editor screen from the admin sidebar. This will launch the full site editor, where you must click the ‘Styles’ icon in the top-right corner.


Next, you need to click on the ‘Colors’ panel to access the additional settings.
Once you are there, go ahead and click on the ‘Text’ option under the ‘Elements’ section.


Once the text color settings have opened, you will be able to see a number of text colors under the ‘Default’ section.
Alternatively, you can also use a custom text color by clicking on the Custom Color tool and opening up the Color Picker.


Once you have made your choice, simply click on the ‘Save’ button to store the changes.
Bonus Tip: You can use the WebAIM Contrast Checker tool to check if your background and text color work together. The tool can help you improve text readability on your website.


To customize text color using CSS, the theme customizer, or SeedProd, you may want to see our guide on how to change the text color in WordPress.
How to Change the Text Selection Color in WordPress
When a visitor selects text on your website, it will show a background color. The default color is blue.


However, sometimes the color may not blend well with your WordPress theme, and you might want to change it.
Adding CSS code to your theme files can easily change the text selection color. However, keep in mind that switching to another theme or updating your current theme will make the CSS code disappear.
That’s why we recommend using the WPCode plugin, which is the best WordPress code snippets plugin on the market.
First, you need to install and activate the WPCode plugin. For more instructions, please see our guide on how to install a WordPress plugin.
Upon activation, head over to the Code Snippets » + Add Snippets page from the admin sidebar.
Then, simply click the ‘Use Snippet’ button under the ‘Add Your Custom Code (New Snippet)’ heading.


Once you are on the ‘Create Custom Snippet’ page, you can start by typing a name for your code snippet.
After that, you must choose ‘CSS Snippet’ as the ‘Code Type’ from the dropdown menu on the right.


Now, go ahead and copy and paste the following CSS code into the ‘Code Preview’ box.
::-moz-selection { background-color: #ff6200; color: #fff; } ::selection { background-color: #ff6200; color: #fff; }
You can change the text selection color by substituting the hex code next to the ‘background-color’ in the CSS snippet.


Once you have added the code, scroll down to the ‘Insertion’ section.
Here, you need to choose the ‘Auto Insert’ method to execute the code automatically upon activation.


After that, scroll back to the top and toggle the ‘Inactive’ switch to ‘Active’.
Finally, go ahead and click the ‘Save Snippet’ button to store your changes.


Now, you can visit your website to check the text selection color.
You can also change the text selection color using the theme customizer or a plugin. For more details, please see our tutorial on how to change the default text selection color in WordPress.


How to Change the Link Color in WordPress
You can easily change the link color in WordPress using the full site editor or custom CSS.
If you are using a block theme, then head to the Appearance » Editor screen from the admin sidebar.
Once the full site editor has launched, you must click on the ‘Styles’ icon in the top-right corner.


Next, click on the ‘Colors’ panel in the right column to see additional settings.
Once you are there, simply click on the ‘Links’ panel.


This will launch the link color settings, and you will see multiple default link colors displayed in the right column.
However, you can also use a custom link color by clicking on the Custom Color tool to open the Color Picker.


You can also change the hover link color using the FSE. This means the link color will change when someone hovers their mouse over it.
First, you will need to switch to the ‘Hover’ tab from the top.
Once there, you can choose a default or custom color to change the hover link color.


Finally, click on the ‘Save’ button to store your settings.
For more detailed instructions, you may want to see our guide on how to change the link color in WordPress.
How to Change the Admin Color Scheme in WordPress
You can also change the admin color scheme in WordPress if you want. This method can be helpful if you want the admin dashboard to match your website’s branding or use your favorite colors.
However, keep in mind that changing the color scheme of the WordPress dashboard will not affect the visible part of your website.
To change the admin color scheme, simply visit the Users » Profile page from the admin sidebar.
You will see multiple color schemes next to the ‘Admin Color Scheme’ option.
Choose the one you prefer and then click the ‘Update Profile’ button at the bottom of the page to save your changes.


For more detailed instructions, please see our beginner’s guide on how to change the admin color scheme in WordPress.
We hope this article helped you learn how to customize colors on your WordPress website. You may also want to see our ultimate WordPress SEO guide and our article on how to choose a perfect color scheme for your WordPress website.
If you liked this article, then please subscribe to our YouTube Channel for WordPress video tutorials. You can also find us on Twitter and Facebook.
