How to Improve Your 404 Page Template in WordPress (2 Ways)
Do you want to improve your 404 page template in WordPress?
Improving the default WordPress 404 page can help create a better user experience, reduce bounce rate, and increase pageviews.
In this article, we’ll show you how to customize your 404 page template in WordPress, step by step.
Why Improve Your 404 Page Template in WordPress?
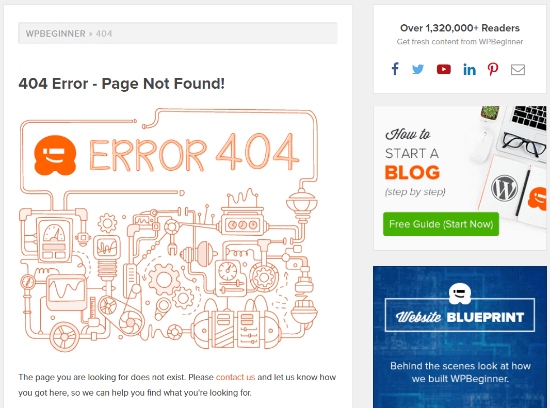
Most visitors who land on the default WordPress 404 page will leave your WordPress website quickly.
This will increase your bounce rate, create a poor user experience, and can even negatively impact your search engine rankings.
By improving your WordPress 404 page, you can send visitors to popular posts, increase pageviews and reduce bounce rate, and turn one time visitors into long-term readers and customers.
When a visitor stays on your site longer, they’re more likely to make a purchase, read more posts, join your email list, and more.
Plus, it can improve your WordPress SEO, so you’ll get more search engine traffic.
Note: it’s important to create a custom 404 page, but you should also track what 404 URLs visitors use to visit your website and then set up proper redirects to improve SEO rankings.
For more details, see our guide on how to easily track 404 pages and redirect them in WordPress.
With that said, let’s take a look at how you can improve your 404 page template in WordPress.
Method 1. Create a Custom 404 Page in WordPress With No Code
The best and most beginner friendly way of improving your 404 page template is using the SeedProd page builder plugin.
SeedProd is the best landing page builder for WordPress. It lets you create, edit, and customize your WordPress pages without writing any code.
With this plugin, you can easily create a custom 404 page using the included 404 page templates.
First thing you need to do is install the SeedProd plugin. For more details, see our step by step guide on how to install a WordPress plugin.
Note: there is a free version of SeedProd available, but we’ll be using the Pro version since it has the 404 page templates we need.
Upon activation, you need to navigate to SeedProd » Settings and enter your license key. You can find this information on your account page on the SeedProd website.
After that, go to SeedProd » Pages and click ‘Set up a 404 Page’ button in the ‘404 Page’ meta box.
This will bring you to a page where you can select your 404 page template.
There are dozens of professionally designed 404 page templates you can choose to help you get started quickly.
To select a template, hover over it and click the ‘Checkmark’ icon. For this tutorial, we’ll be using the ‘Oh No 404 Page’ template, but you can use any template you like.
After selecting a template, you’ll be taken to the drag and drop builder, where you can start customizing your 404 page.
You’ll find blocks and sections you can add to your 404 page on the left side of the screen. The right side of the page is the live preview. Every element on the page can be edited and customized.
First thing, we’re going to add text and tell users what to do next. Instead of simply landing on a 404 page and leaving, you can direct your visitors towards valuable content and the next actions to take.
To do this, drag the ‘Text’ block over to your page, and click it to change the text.
Next, we will change the home page button link and instead link to one of the most valuable pieces of content.
This can be a post on your WordPress blog that’s the most popular or one that brings you the most revenue.
First, drag over the ‘Headline’ block and add your new headline.
Then, drag over another ‘Text’ block and enter some text that describes your article.
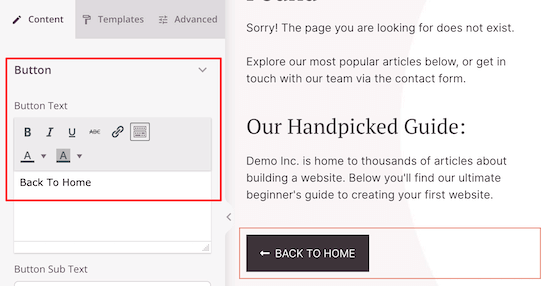
After that, click on the button to bring up the button editor screen.
Here you can customize the text, color, size, and more.
Add Your Most Popular Posts to Your WordPress 404 Page
Next, you can add your most popular articles. Since these articles are proven to be popular, there’s a good chance your visitors will find something they like.
The easiest way to do this is by using the MonsterInsights plugin. It’s the best analytics solution for WordPress used by over 3 million websites.
With this plugin, you can simply add popular posts anywhere on your WordPress website.
For more details, see our guide on how to display popular posts by views in WordPress.
Once the plugin is activated and set up, all you have to do is add a single shortcode to your page.
To do this, simply drag the ‘Shortcode’ block over to your page.
Then, enter the following shortcode to display your most popular posts.
[monsterinsights_popular_posts_widget theme="beta"]
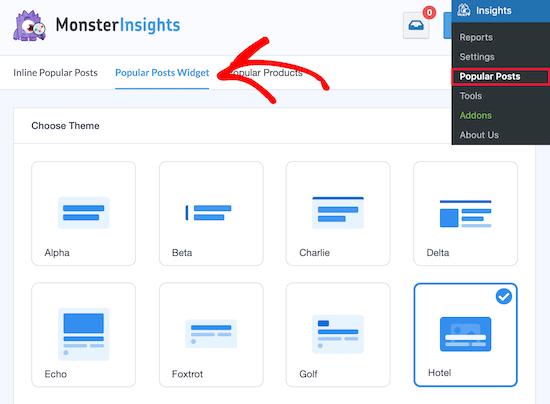
The theme=“beta” portion refers to how your popular posts will display. If you want to see how the different themes look, then go to Insights » Popular Posts and click on ‘Popular Posts Widget’.
In the ‘Choose Theme’ section, you can view each of the themes and their names.
You can also add a headline above your popular posts following the same steps as above.
Add a Contact Form to Your WordPress 404 Page
After that, you can add a contact form directly to your 404 page. This lets your visitors reach out to you if they couldn’t find what they were looking for in the links above.
The best way to add a contact form to your site is using the WPForms plugin. It’s the best contact form plugin for WordPress used by over 4 million websites.
For more details, see our step by step guide on how to create a contact form in WordPress.
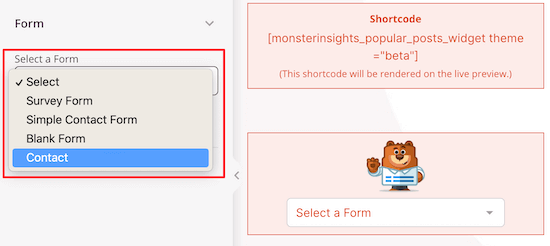
Once the plugin is activated and set up, you can simply drag the ‘Contact Form’ block over to your page.
Then, all you have to do is select your contact form from the drop down list.
You need to create your contact form first before you can add it to your 404 page.
You can also add a ‘Headline’ or ‘Text’ block above your contact form.
Follow the same steps as above to add those blocks.
Once you’re done making changes, make sure you click ‘Save’ in the upper right corner of the page.
If you want to publish your page live, then select the drop down arrow next to ‘Save’ and click ‘Publish’.
You can also change the logo and navigation menu by clicking on them and making changes with the panel on the left, then following the same editing process as above.
Feel free to continue customizing your page, adding new blocks, and testing different layouts to see what your visitors prefer.
If you’re a WooCommerce store owner, then you can customize your 404 page by displaying popular products to help get more sales.
To make your new 404 page active, navigate back to SeedProd » Pages and then switch the ‘404 Page’ toggle to ‘Active’.
Now, your visitors will see your high converting 404 page, instead of the default option.
Pro tip: you can track the performance of your WordPress 404 page to see how it’s converting and which changes are the most useful. For more details, see our beginner’s guide on how to install Google Analytics in WordPress.
Method 2. Create a Custom 404 Page in WordPress By Adding Code
This method is not as beginner friendly because you will have to add code and modify WordPress theme files.
If you haven’t done this before, then please see our beginner’s guide to pasting snippets from the web into WordPress.
First, you need to create a new file in your WordPress theme folder and name it 404.php. If your theme already has a 404.php file, then you’ll need to edit that file instead.
To edit this file, you need to connect to your WordPress hosting account with an FTP client, or their file manager tool.
After you’re connected to your website, you can see your 404.php file in your WordPress theme’s folder.
Note: before you customize your WordPress theme, we recommend backing up your WordPress site. For more details, see our guide on how to backup and restore your WordPress site.
Display Most Popular Posts on 404 Page
First thing you need to do is install and activate the free WordPress Popular Posts plugin. It’s one of the best popular posts plugins for WordPress.
For more details, see our step by step guide on how to install a WordPress plugin.
Upon activation, you need to add this template tag into your 404.php file where you want to display the popular posts.
<?php wpp_get_mostpopular(); ?>
Display Most Commented Posts on 404 Page
To add the most commented posts to your WordPress 404 page we’ll be using the same plugin you activated above.
Simply add the following template tag where you want to display your most commented posts.
<?php wpp_get_mostpopular("range=all&order_by=comments"); ?> You can also check out our guide on how to display most commented posts in WordPress.
Display Recent Posts on 404 Page
There are multiple ways to display recent posts in WordPress.
The easiest way is to add this template tag in your 404 template to display your recent posts.
<?php wp_get_archives( array( 'type' => 'postbypost', 'limit' => 10, 'format' => 'custom', 'before' => '', 'after' => '<br />' ) ); ?>
Display Random Posts on 404 Page
If you want to display a random list of posts in WordPress, then you can simply add this code in your 404 template where you want to display a random list of posts from your site.
<ul> <?php $posts = get_posts('orderby=rand&numberposts=5'); foreach($posts as $post) { ?> <li><a href="<?php the_permalink(); ?>" title="<?php the_title(); ?>"><?php the_title(); ?></a> </li> <?php } ?> </ul> Add Monthly Archives with Compact Archives
If you have a lot of content on your website, then one great way to organize this is by showing your monthly archives.
Here at Latest Blog, we display our monthly archives on our 404 page using the Compact Archives plugin. This plugin is developed and maintained by our team.
For more details, see our guide on how to create compact archives in WordPress.
Once the plugin is activated and set up, simply add the following code to your 404.php file.
<p><strong>By Date</strong></p> <ul> <?php compact_archive($style='block'); ?> </ul>
When a user lands on your 404 page they’ll see your compact post archives.
Here’s how it displays on our 404 page.
A Sample 404 Template for WordPress
Here is a sample 404.php file based on the default WordPress theme Twenty Twenty-One’s 404 page template.
<?php /** * The template for displaying 404 pages (not found) * * @link https://codex.wordpress.org/Creating_an_Error_404_Page * * @package WordPress * @subpackage Twenty_Twenty_One * @since Twenty Twenty-One 1.0 */ get_header(); ?> <header class="page-header alignwide"> <h1 class="page-title"><?php esc_html_e( 'Nothing here', 'twentytwentyone' ); ?></h1> </header><!-- .page-header --> <div class="error-404 not-found default-max-width"> <div class="page-content"> <p><?php esc_html_e( 'It looks like nothing was found at this location. Maybe try a search?', 'twentytwentyone' ); ?></p> <?php get_search_form(); ?> <h4>While you're here, check out some of our popular content:</h4> <div class="col1"> <div class="col-header"> <strong>Popular</strong> </div> <?php wpp_get_mostpopular(); ?> </div> <div class="col2"> <div class="col-header"> <strong>Comments</strong> </div> <?php wpp_get_mostpopular("range=all&order_by=comments"); ?> </div> <div class="col3"> <div class="col-header"> <strong>Recent</strong> </div> <?php wp_get_archives( array( 'type' => 'postbypost', 'limit' => 5, 'format' => 'custom', 'before' => '', 'after' => '<br />' ) ); ?> </div> </div><!-- .page-content --> </div><!-- .error-404 --> <?php get_footer(); Compare this 404 template with the default template in Twenty Twenty-One.
You will notice that right after the search form we have added our custom code to display popular, most commented, and recent posts.
After that we added custom CSS to the WordPress theme stylesheet to divide it into columns.
For more details, see our guide on how to easily add custom CSS to your WordPress site.
.col1, .col2, .col3 { width:30%; float:left; padding:0px 10px 10px 10px; margin:0px; } .col3:after{ clear:both; } .col-header { background:#28303D; color:#D1E3DD; margin:0px; padding:1px; text-align:center; } This is the end result after adding the custom 404 page code above.
We hope this article helped you improve your 404 page template in WordPress. You may also want to see the best WordPress 404 error page design examples and our expert picks of the best web push notification software to grow your website traffic.
If you liked this article, then please subscribe to our YouTube Channel for WordPress video tutorials. You can also find us on Twitter and Facebook.


